Box 18 Live Oak Tombstone Stress and Warping

which is a lot to say, kind of.

This box is the eighteenth.  It is made of Live Oak, a wood that I have never worked with.  Like Box 6, it is a tombstone planter, which is to say that two ends of it are shaped like tombstones, and not that one plants tombstones there.  Unlike Box 6, which was of a scraggly Oklahoma white oak and held together with metal screws, this one has no metal, is held together by dowels and glue.

You see the trouble, of course.  The rectangular walls were flatly affixed to the tombstone walls.  Dirt was added.  Was the dirt causative of the warping, or the dirt in combination with the subsequent watering?  A simple theory is that the wetness on the inside caused that side to expand and thus the warping.  I was surprised at the strength of the process, though, that it broke the glue bonds on the dowels.  If I should ever perpetrate this design again I’d be inclined to put more dowels in, and at angles, to see how much power the warping has relative to a fastening method designed to prevent it.

The box is quite heavy, as live oak is just heavy, as compared to conventional oaks.  The janka hardness is 2680, nearly twice that of white oak (1360).  Supposedly America owes its successful birth partly to live oak, of which the USS Constitution was made and off which canon balls bounce.  That’s a game changer.  Assuming this planter does not tear itself apart with these powerful stresses, and that some unforeseen bug nemesis does not appear, it could be that these design mistakes will stand illustratively for a considerable time.

It was a nice wood to work with.  A lot of curves in the grain but a very nice smell, a reassuring strength and density, all bringing a sense that one must be doing something serious.

Spoon 5

Cumaru was the driver here, that I’d never worked with it (as true of most woods) and that, having designs to make a few other things with it, to make a spoon would be a good way to learn how it responds to tools.

Spoon 5 Rough 1 Spoon 5 Rough 1 Detail

I cut the shape with a jigsaw and a Ryoba.  The bowl I did as a tiered excavation with a router, later to be smoothed with a few different bits via Dremel.

Spoon 5 Up Spoon 5 Down

Sanded to 220, standard finish of tung oil cut 50/50 with limonene.  The wood was delightful to work, heavy, holds detail, beautiful smell.

The Death of Little Dragon

So often we fail to appreciate what we have until it is gone.  We vow to cease being distracted from things that really matter.  We vow to forswear our insularity.  This lasts a little while, maybe.

This morning I saw the tower shake.  I saw him fall.  It was not pretty.  His youthful plasticity was not there to save him.  Caution for younger and sensitive viewers: the image which follows graphically depicts fatal injuries.

Little Dragon Dead

It was the sort of thing that doctors shake their heads at – no fixing that.  Right through the heart, the ribs, torso split in two.

Little Dragon was born in San Francisco and flew here to Massachusetts when but an infant.  He spent the most of his days in happy simplicity of Wood Block City.

Little Dragon Wood Block City

He was a carefree youngster, given to perching on wood blocks

Little Dragon 4 Little Dragon 2 Little Dragon 3

though sometimes a book would do, especially if he wanted to take a rest.

Little Dragon 1

That striped tower arrived in the city after he was born.  He took a fancy to perching upon it, though it was a little small for his feet and a little shaky, as compared to the other wood blocks.  Just the other morning – I wish I had a picture – he was perched atop this tower as the sun rose and cast a gentle and golden light on his mysterious dragon smile.  He looked very happy, clearly not realizing that this would become his tower of Doom.

Little Dragon that Dreadful Tower

Some say that everything should be understood as an Act of God, but this morning there can be no question that there was an Act of Dog.  The dog, attempting to impress upon me the need to take a walk in the woods, bumped the table.  I saw the tower shake.  I saw him fall.

Oh fleeting quick, we cannot capture thee.Little Dragon 5

Four Fixes

Little things accrue (of course they disappear too), little things we mean to do.  Here gathered as some sort of existential exhibit are four, all sharing a wood and glue theme.

Fix #1 – A Vase of Wormy Pine had a broken rim.  A small break really.

Fix batch 1 - Wormy Pine Vase

The good part of this repair was that I was able to find a similar softwood and pretty much closely match both color and grain direction.  The less than good part was that all the curve fitting, to get the inserted triangle to match the fluting curls top and bottom, had obvious failings.  Overall a useful lesson in how easy it is to fail at something with no conceptual challenge.  The execution was more demanding than I had patience for, and the benefit of approaching perfection (other than aesthetic) not high at all.

Fix #2 – Second beak break requires more substantial address

This concerns the original war spoon, the progenitor, a spoon that sits on my desk and doubles very nicely as my back-scratcher, and as such the availability of the beak is a functional requirement.

New War Spoon Archetype

Sometimes the war spoon falls off the desk and twice now his beak has broken off.  This happens right where the beak joins the spoon head and it is made the more likely by the grain being perpendicular to the direction of the beak.  Reconstructive surgery!

Fix batch 1 - War Spoon Beak A

Gruesomely the patient lay without anesthesia in the operating vise for over 12 hours.  I used saw and chisel and drill to form a half inch deep base in the center third of the spoon bowl side.  Similarly I dug such a trench at the base and top side of the beak.  I reattached the beak –

Fix batch 1 - War Spoon Beak B

And then inserted a fitting piece of mahogany (the same wood as the spoon) into the trench, in this case with the grain perpendicular to the direction of the beak.  Instead of the wood glue that I had used in the previous ‘stick it back on’ repair I used epoxy-resin, and mixed up a batch that I laced with sawdust from the mahogany.  This would give the right color to any hardened glue exposed in the final joint.  Came out great – remind me I have to return here to get a picture of the result.

Fix #3 – Kitchen stool had a broken stretcher.

More like obliterated.  All that remained was about fifteen percent of the original, not at all re-usable.  The wood seemed to be a maple with some sort of half-washy finish.  By that I mean a little milkiness, but some grain visible.

I had no maple lying around, nor any half-washy finishes, but I did have a piece of red oak that upon which I had been testing a draw knife.  I decided that to use a draw knife to fashion anything that would experience utility was a rare notch for a modern belt.  Thing was, it’s such an intuitive and satisfying tool to use.  Took no time.  Easy to zoom right to target, with opportunity for subtle and creative nuance.

Fix batch 1 - Maple Stool AFix batch 1 - Maple Stool B

Fix #4 – Dining room chair has two dislocations of the leg

The back right leg no longer goes into the seat nor into the stretcher

Fix batch 1 - Cherry Chair A

This had been fixed before, but before I knew anything of glue.  I think I used something soft and rubbery – not really very much adhesiveness – and as you might expect, it did not hold under the stresses a chair would naturally experience.

This was therefore a straightforward fix.  Use a glue with high adhesiveness and great strength.

Fix batch 1 - Epoxy Resin BeforeiFix batch 1 - Epoxy Resin After

Epoxy-resin.  This is the same stuff I used for the beak repair.  Notice the dried and darker smudge on the left.  That is where I mixed the beak batch with the sawdust.

Fix batch 1 - Cherry Chair B

Now it sits drying.  I expect it should be stronger than new by tomorrow.  If not I will report.

Please have a happy and effective day.


Chair 1

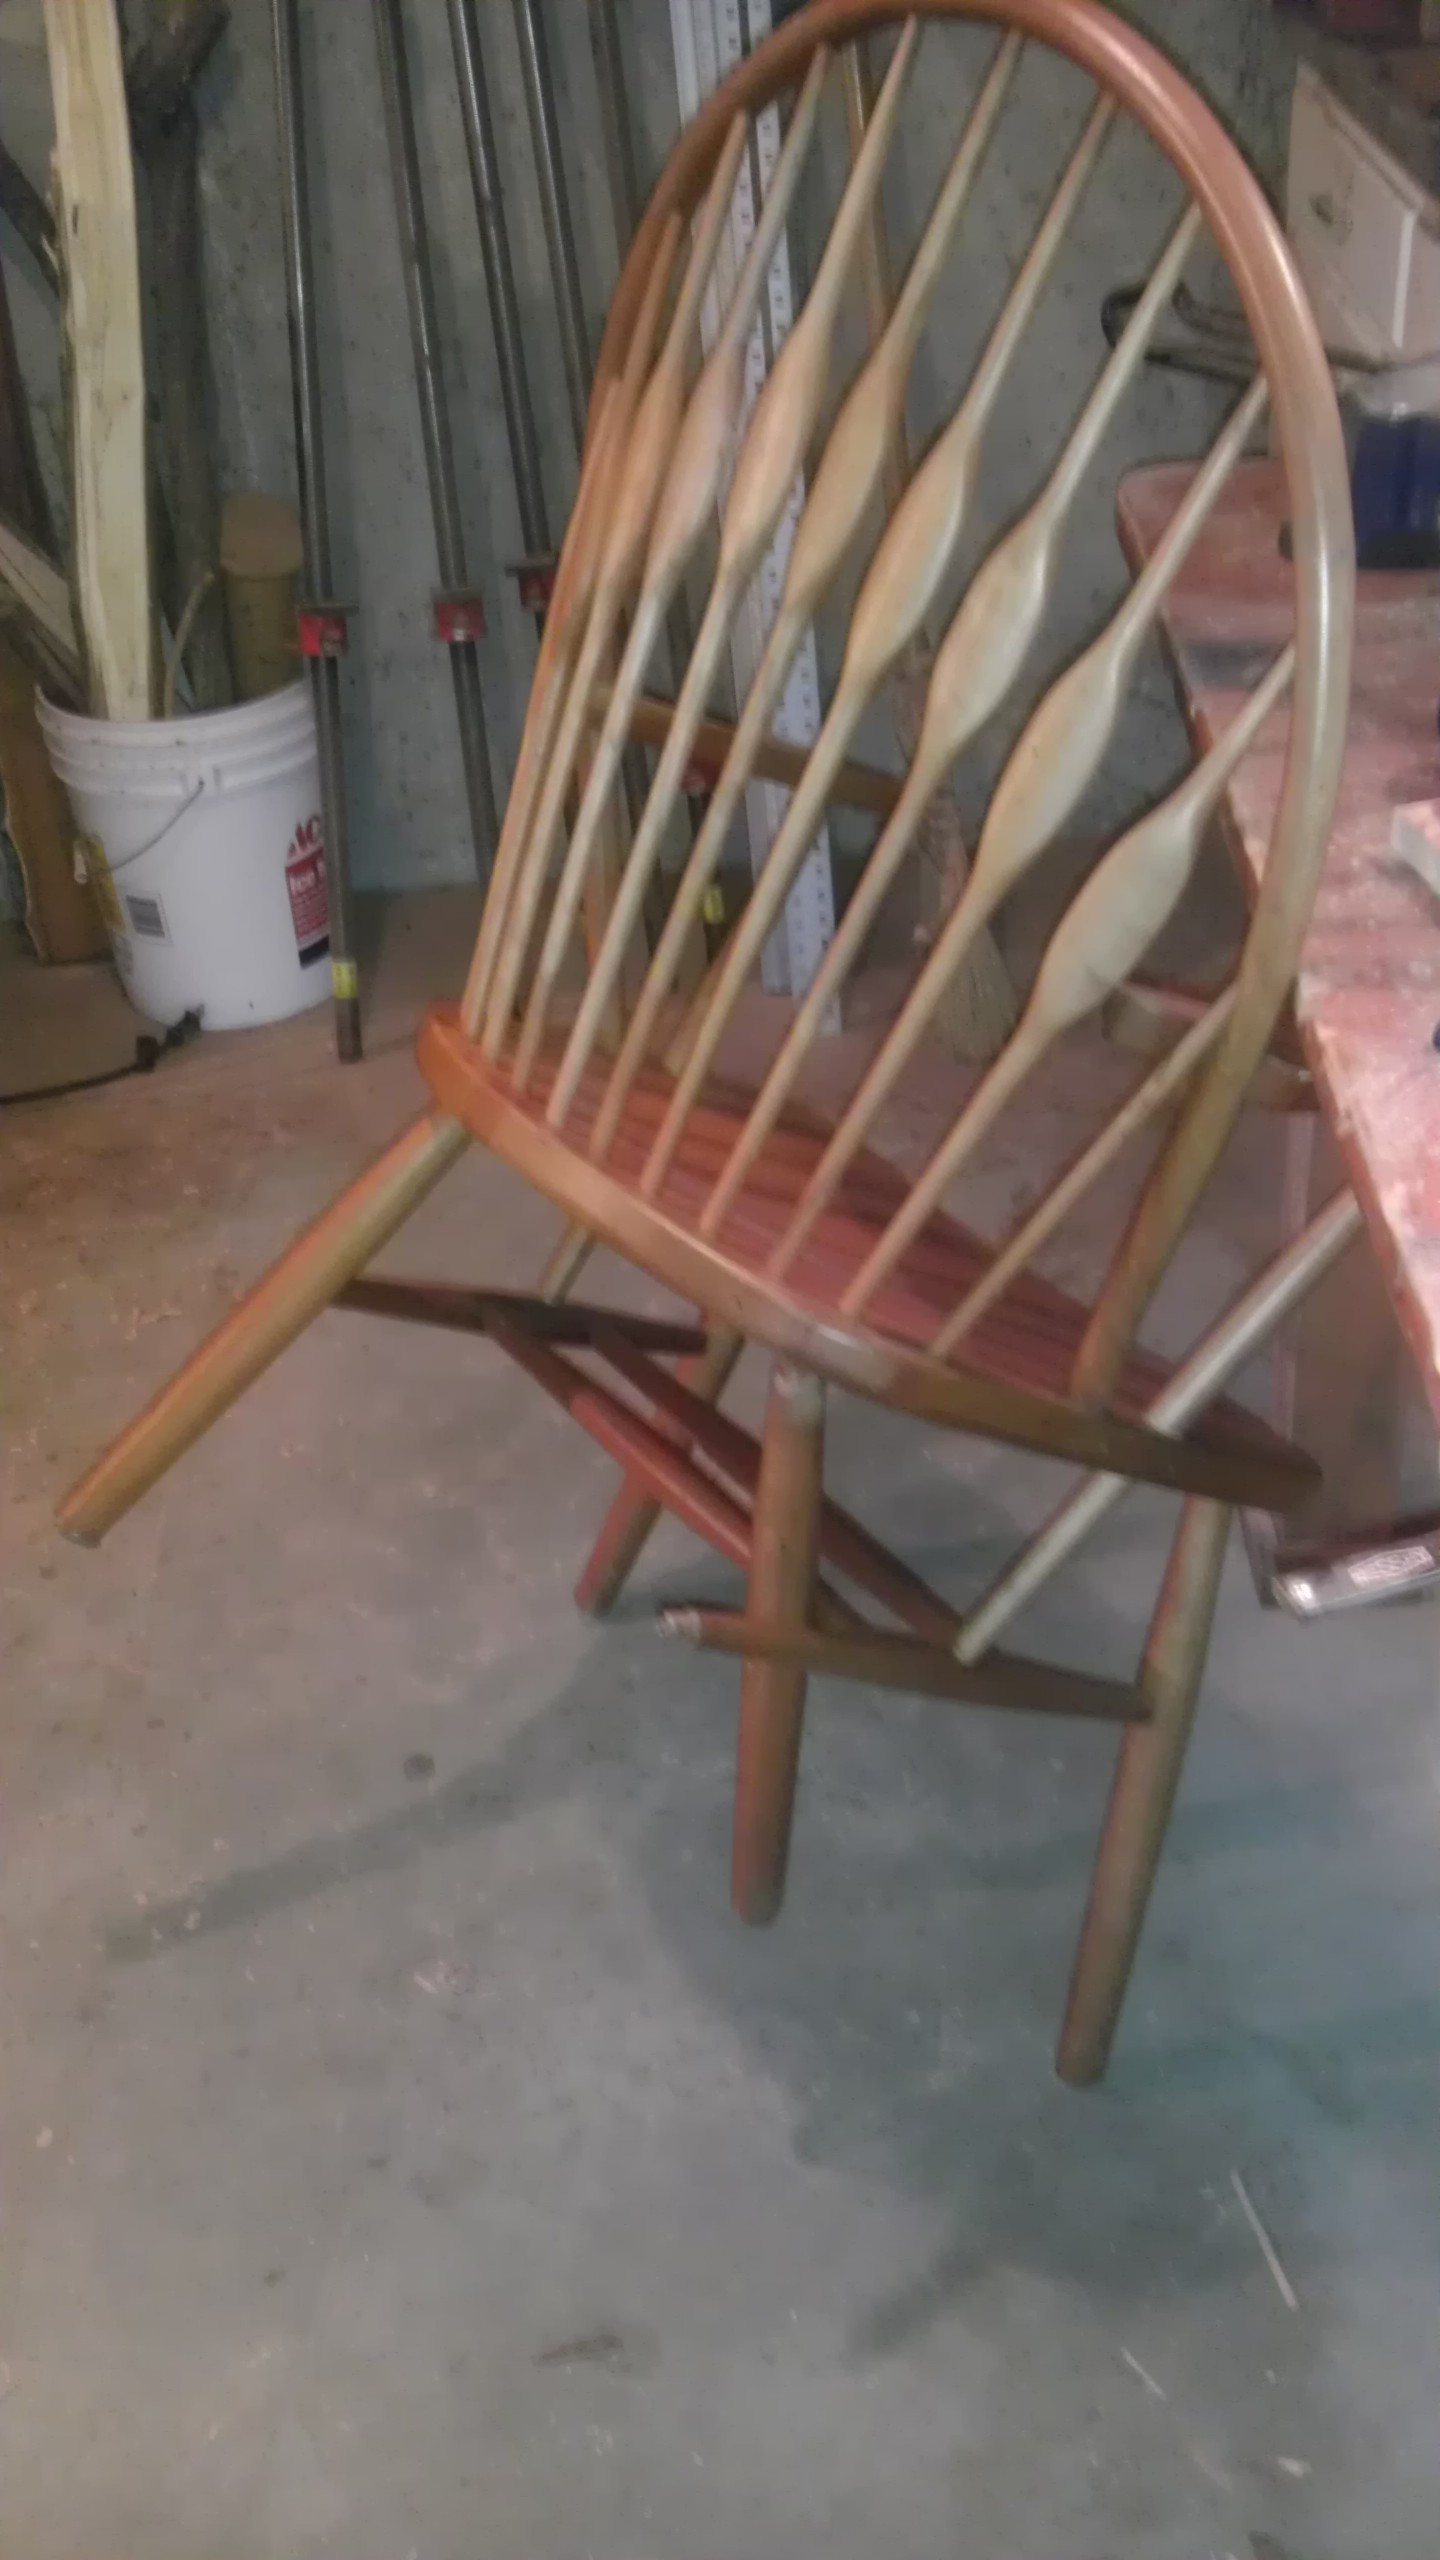
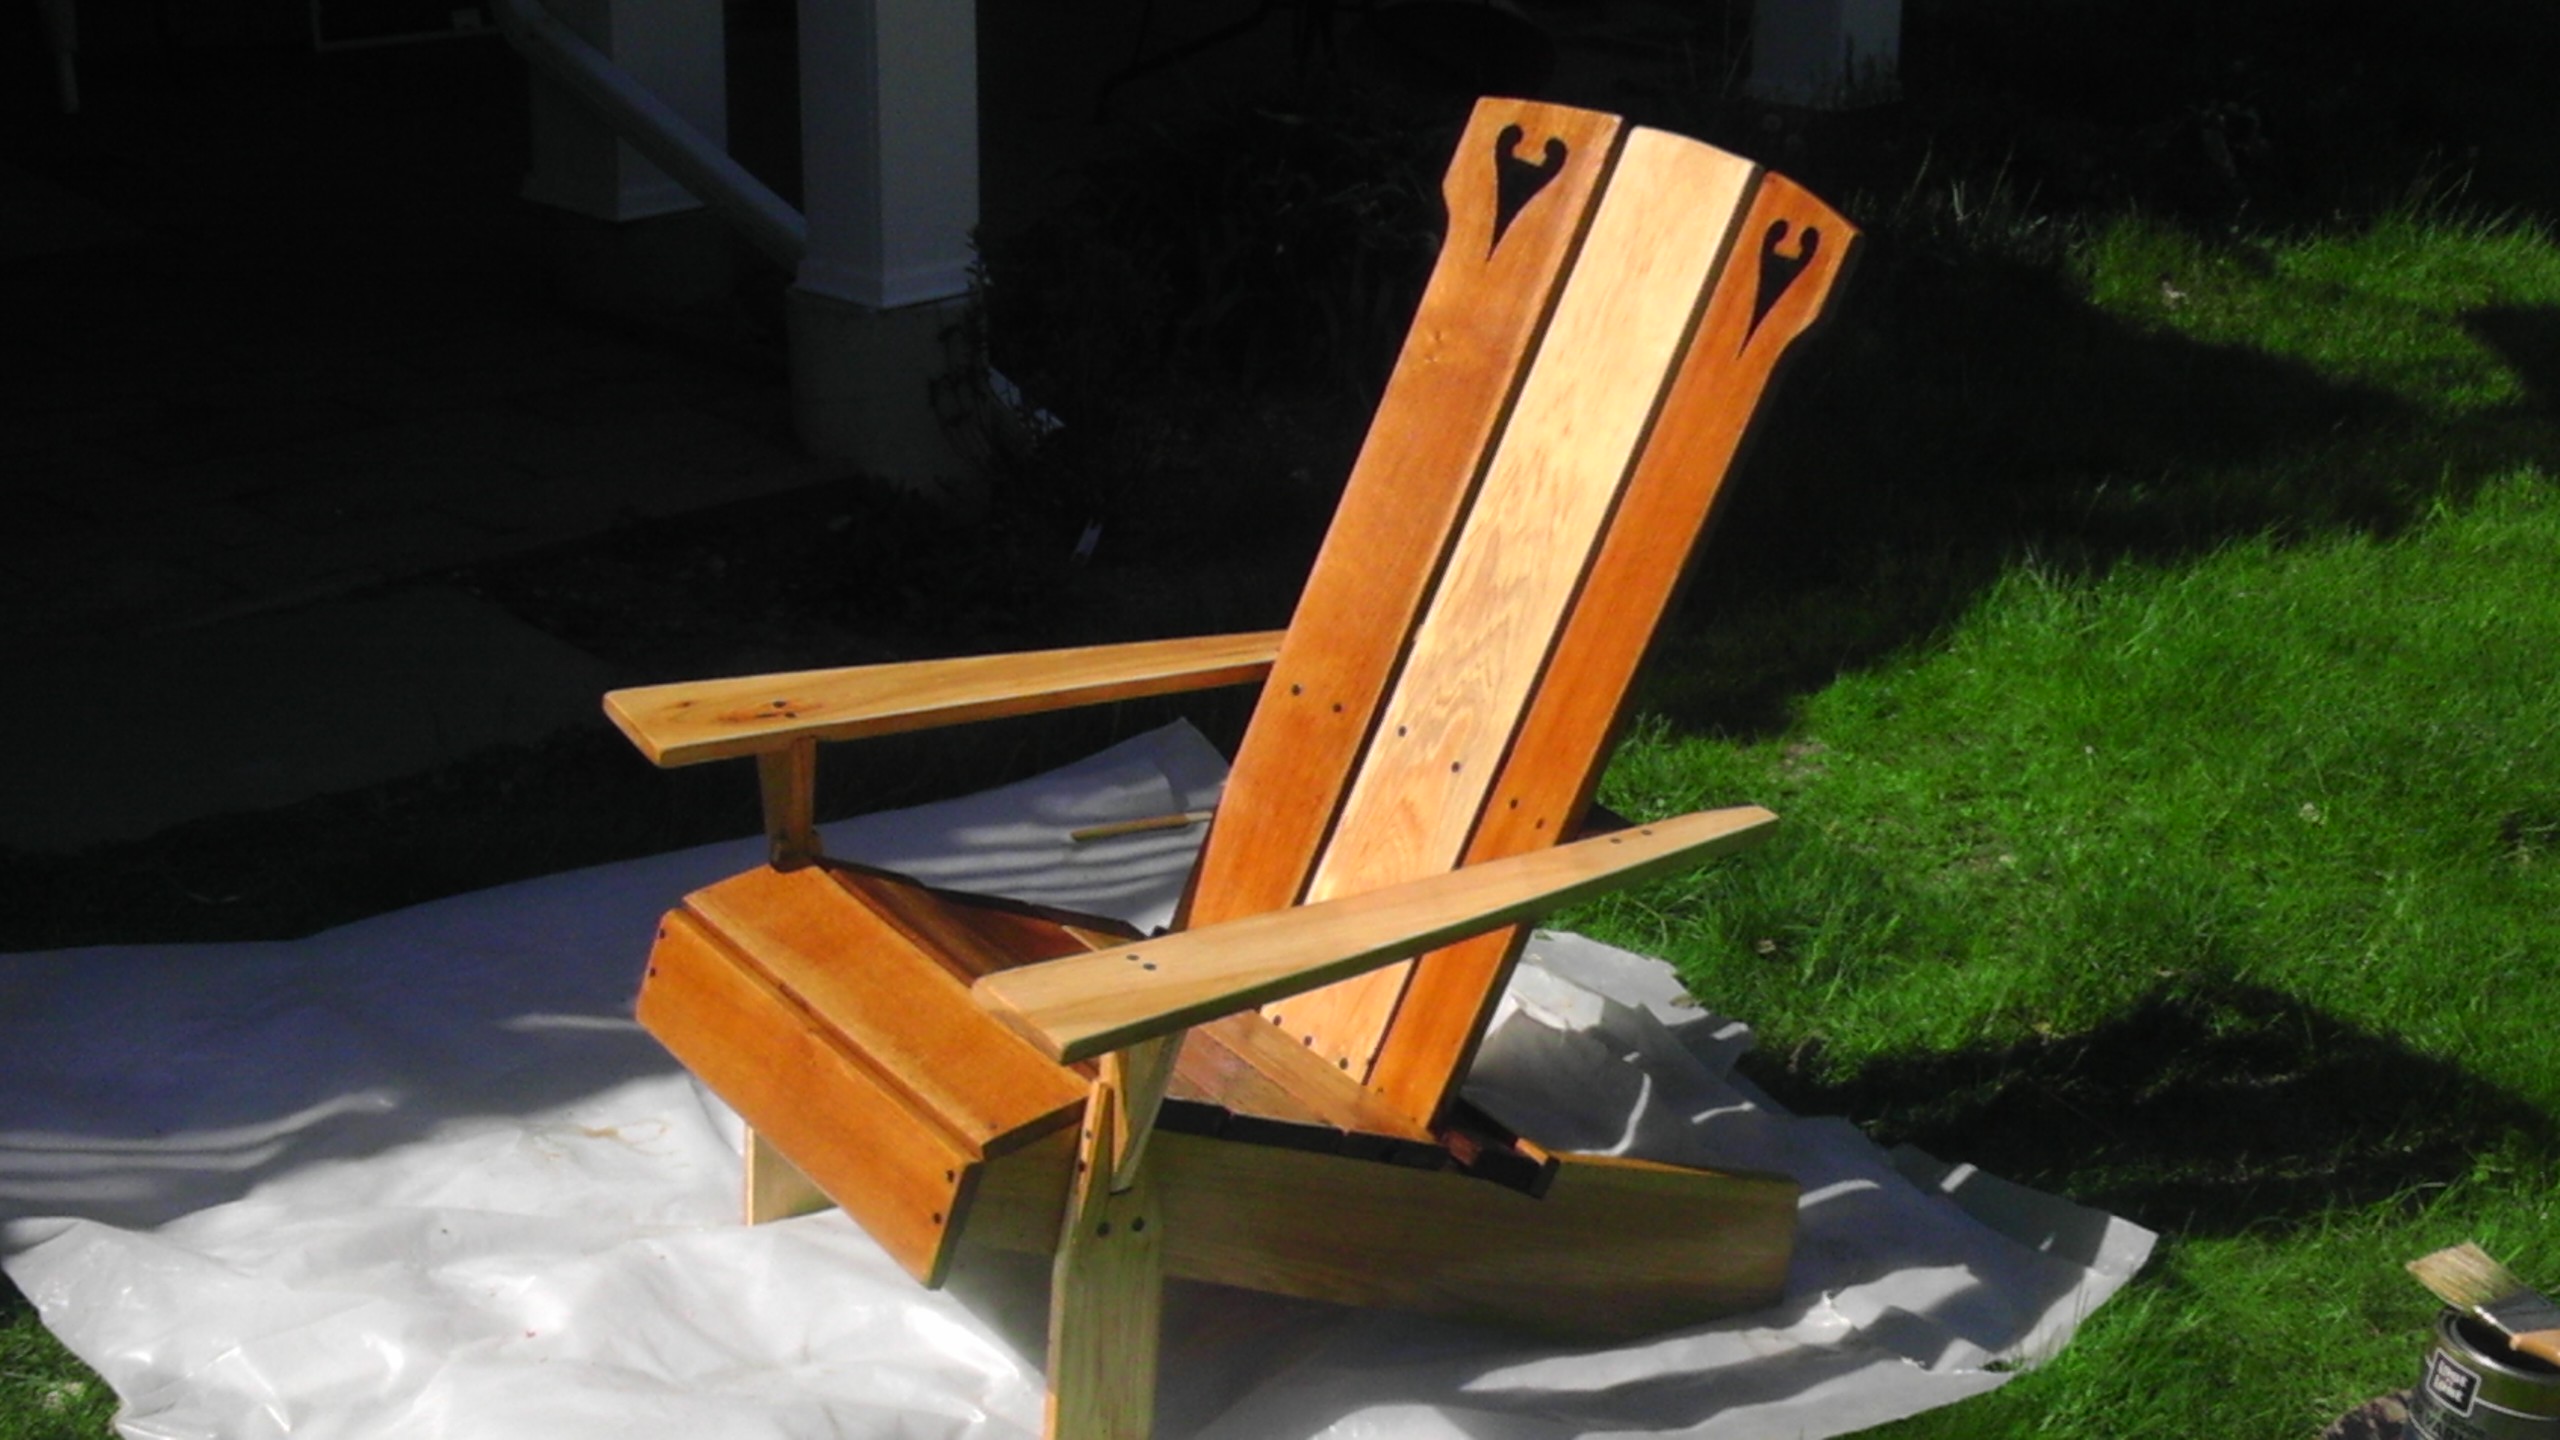
Alright dear readers.  I know how you’ve been fretting about the incompleteness of certain tasks – tasks begun in all great earnestness but seeming to fade without grandeur … into the woodwork!?  Here we have a tale of such a task now nobly redeemed, having arrived at completion, freeing psychological energy and brightening attitudinal space.  It’s a chair, basically, the first glimpse of which you got almost three years ago here.

It began with finding some wood at the dump, three six foot long one by eights.  At the time I thought they were oak but in the intervening years I’ve learned a lot about wood and I know that they’re not oak, thought what they are I do not know.  Hard though, almost a color like poplar, but surely harder, just not sure.  Let me know if you have an intuition.

Also I had found at the dump an oaken (this was oak, not sure if red or brown, but not white) tall cabinet.  I took the front off it.  Some nice pieces there.  Basically this chair is green, the way folks like to use the word in these days of sustainability, and up-cycled. Those adjectives certainly adhere – we’ll keep building on that.

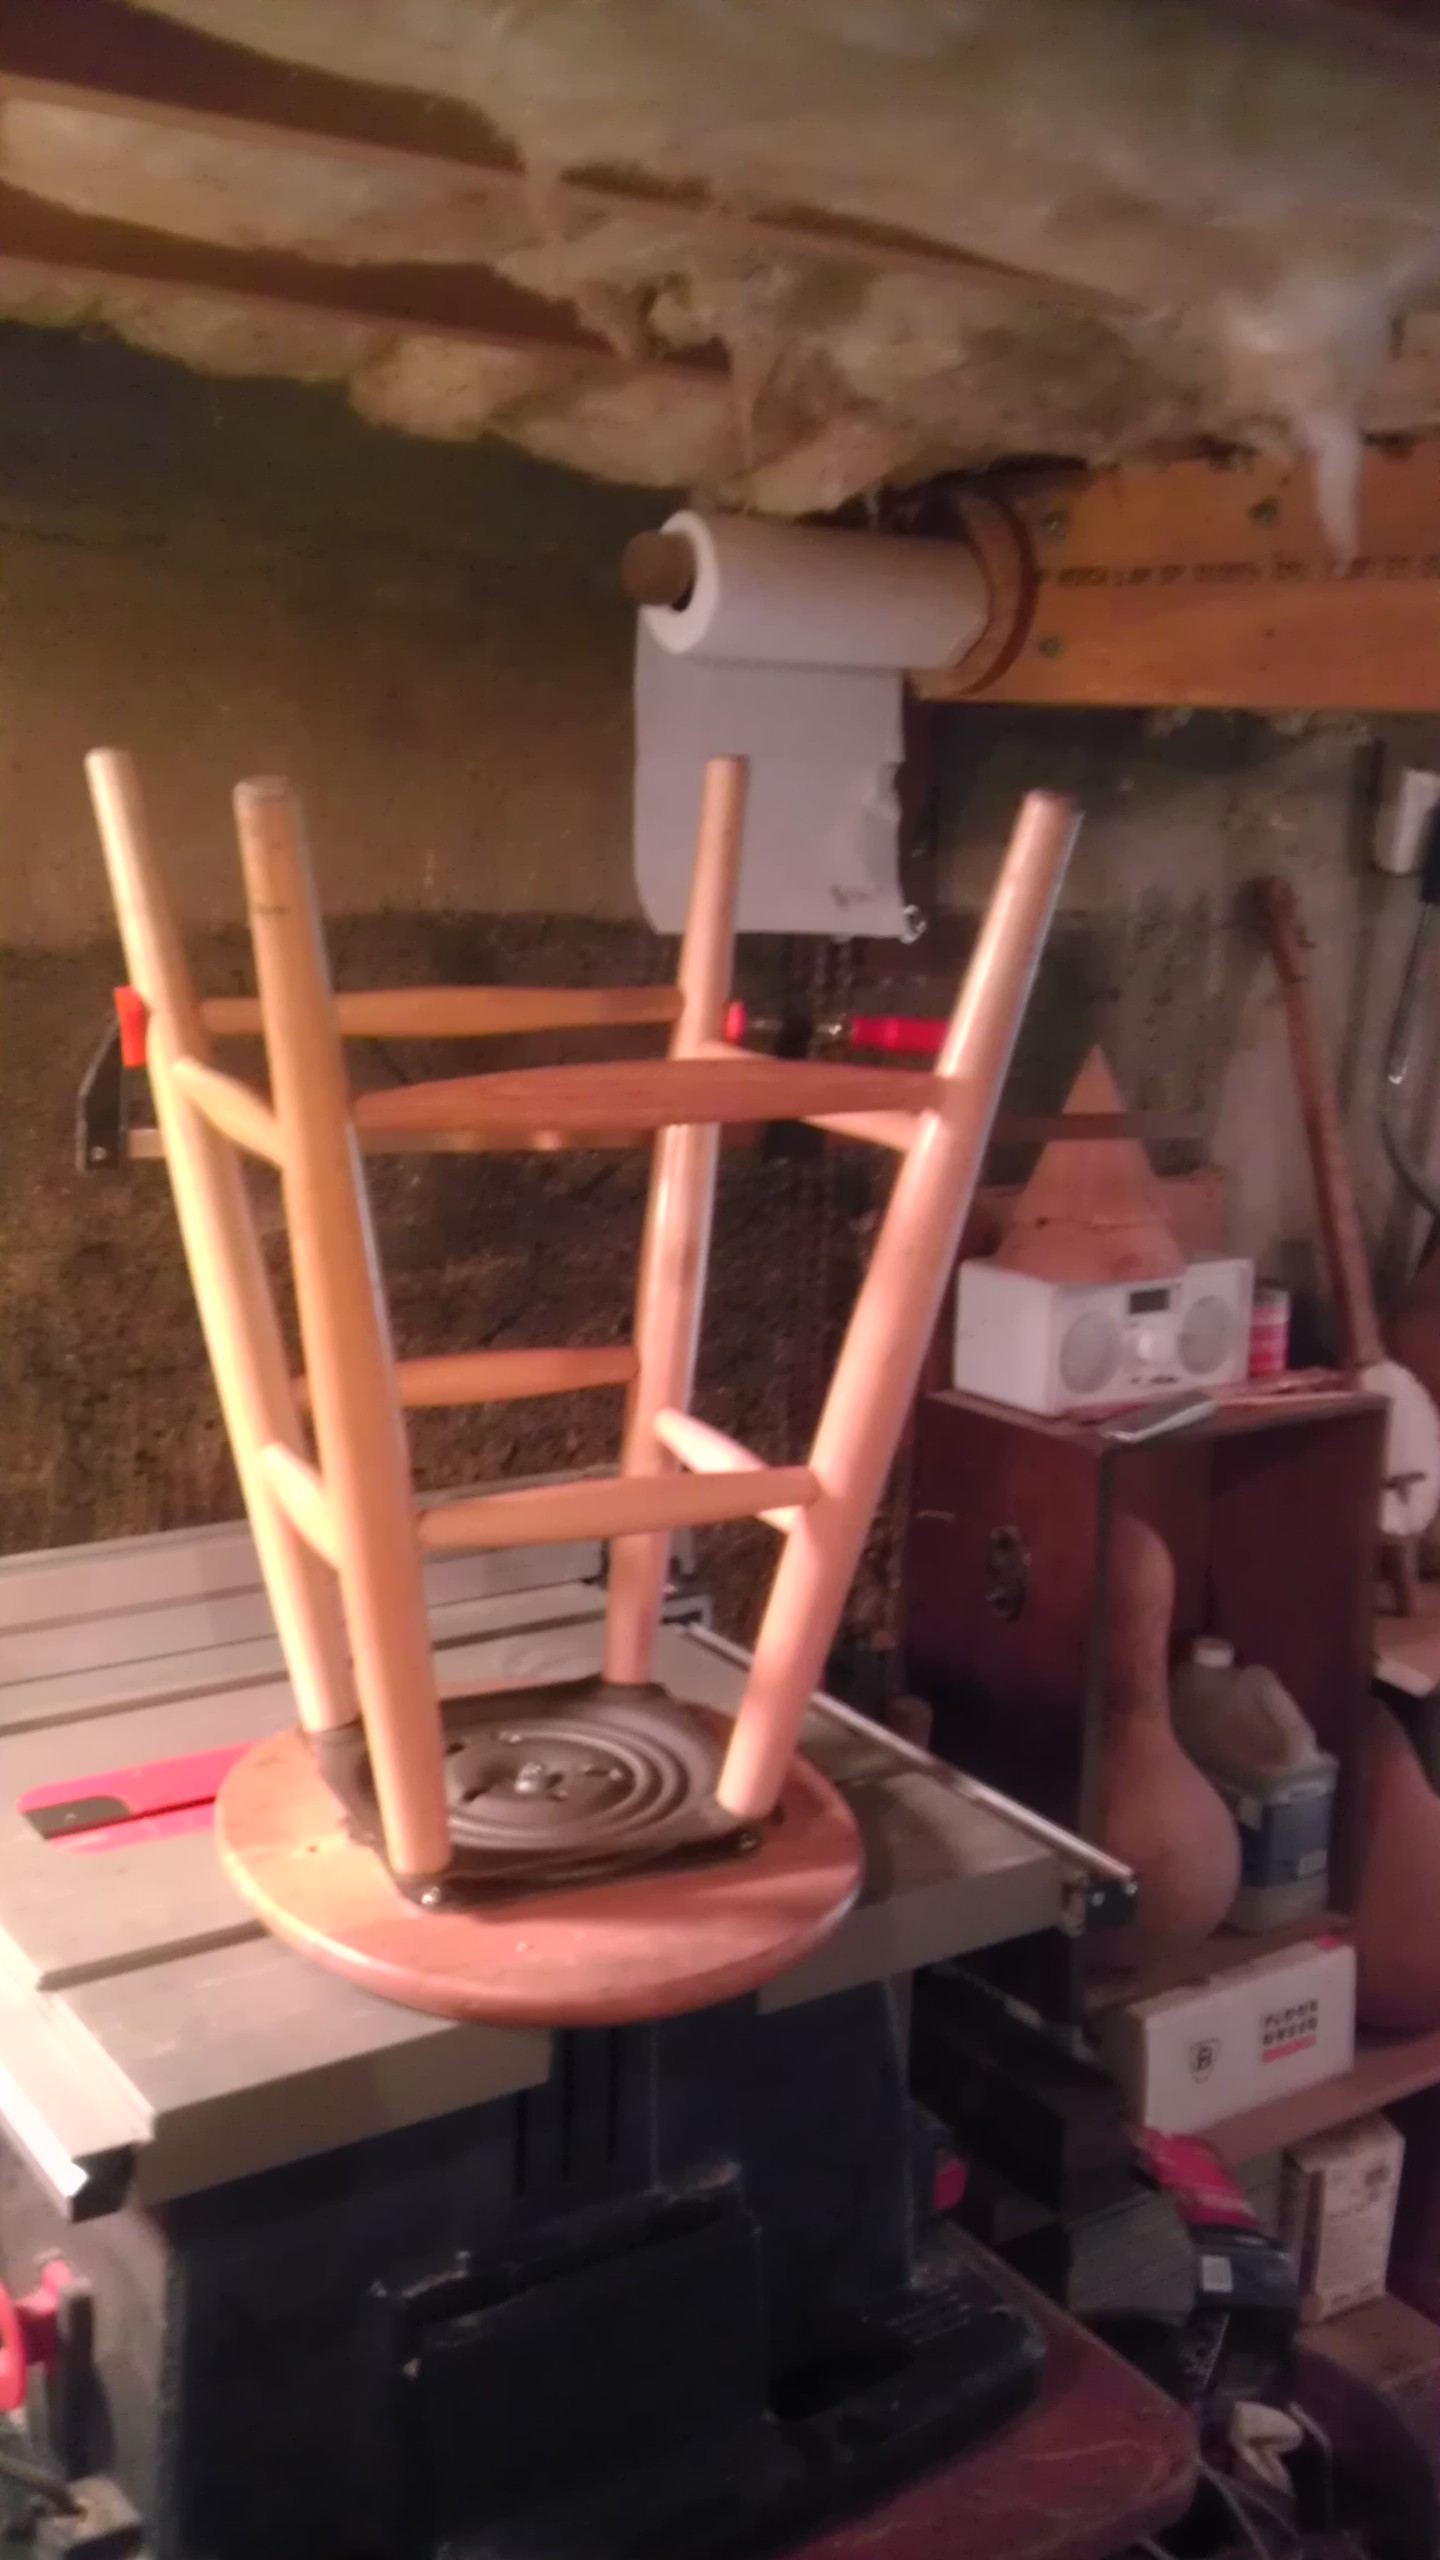
The ideas then, not that I don’t reject Platonic idealism, but in this case the pattern holds more than not, of the chair came first and I sketched them out in wood.

Chair 1 - Ideas

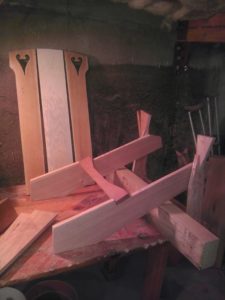
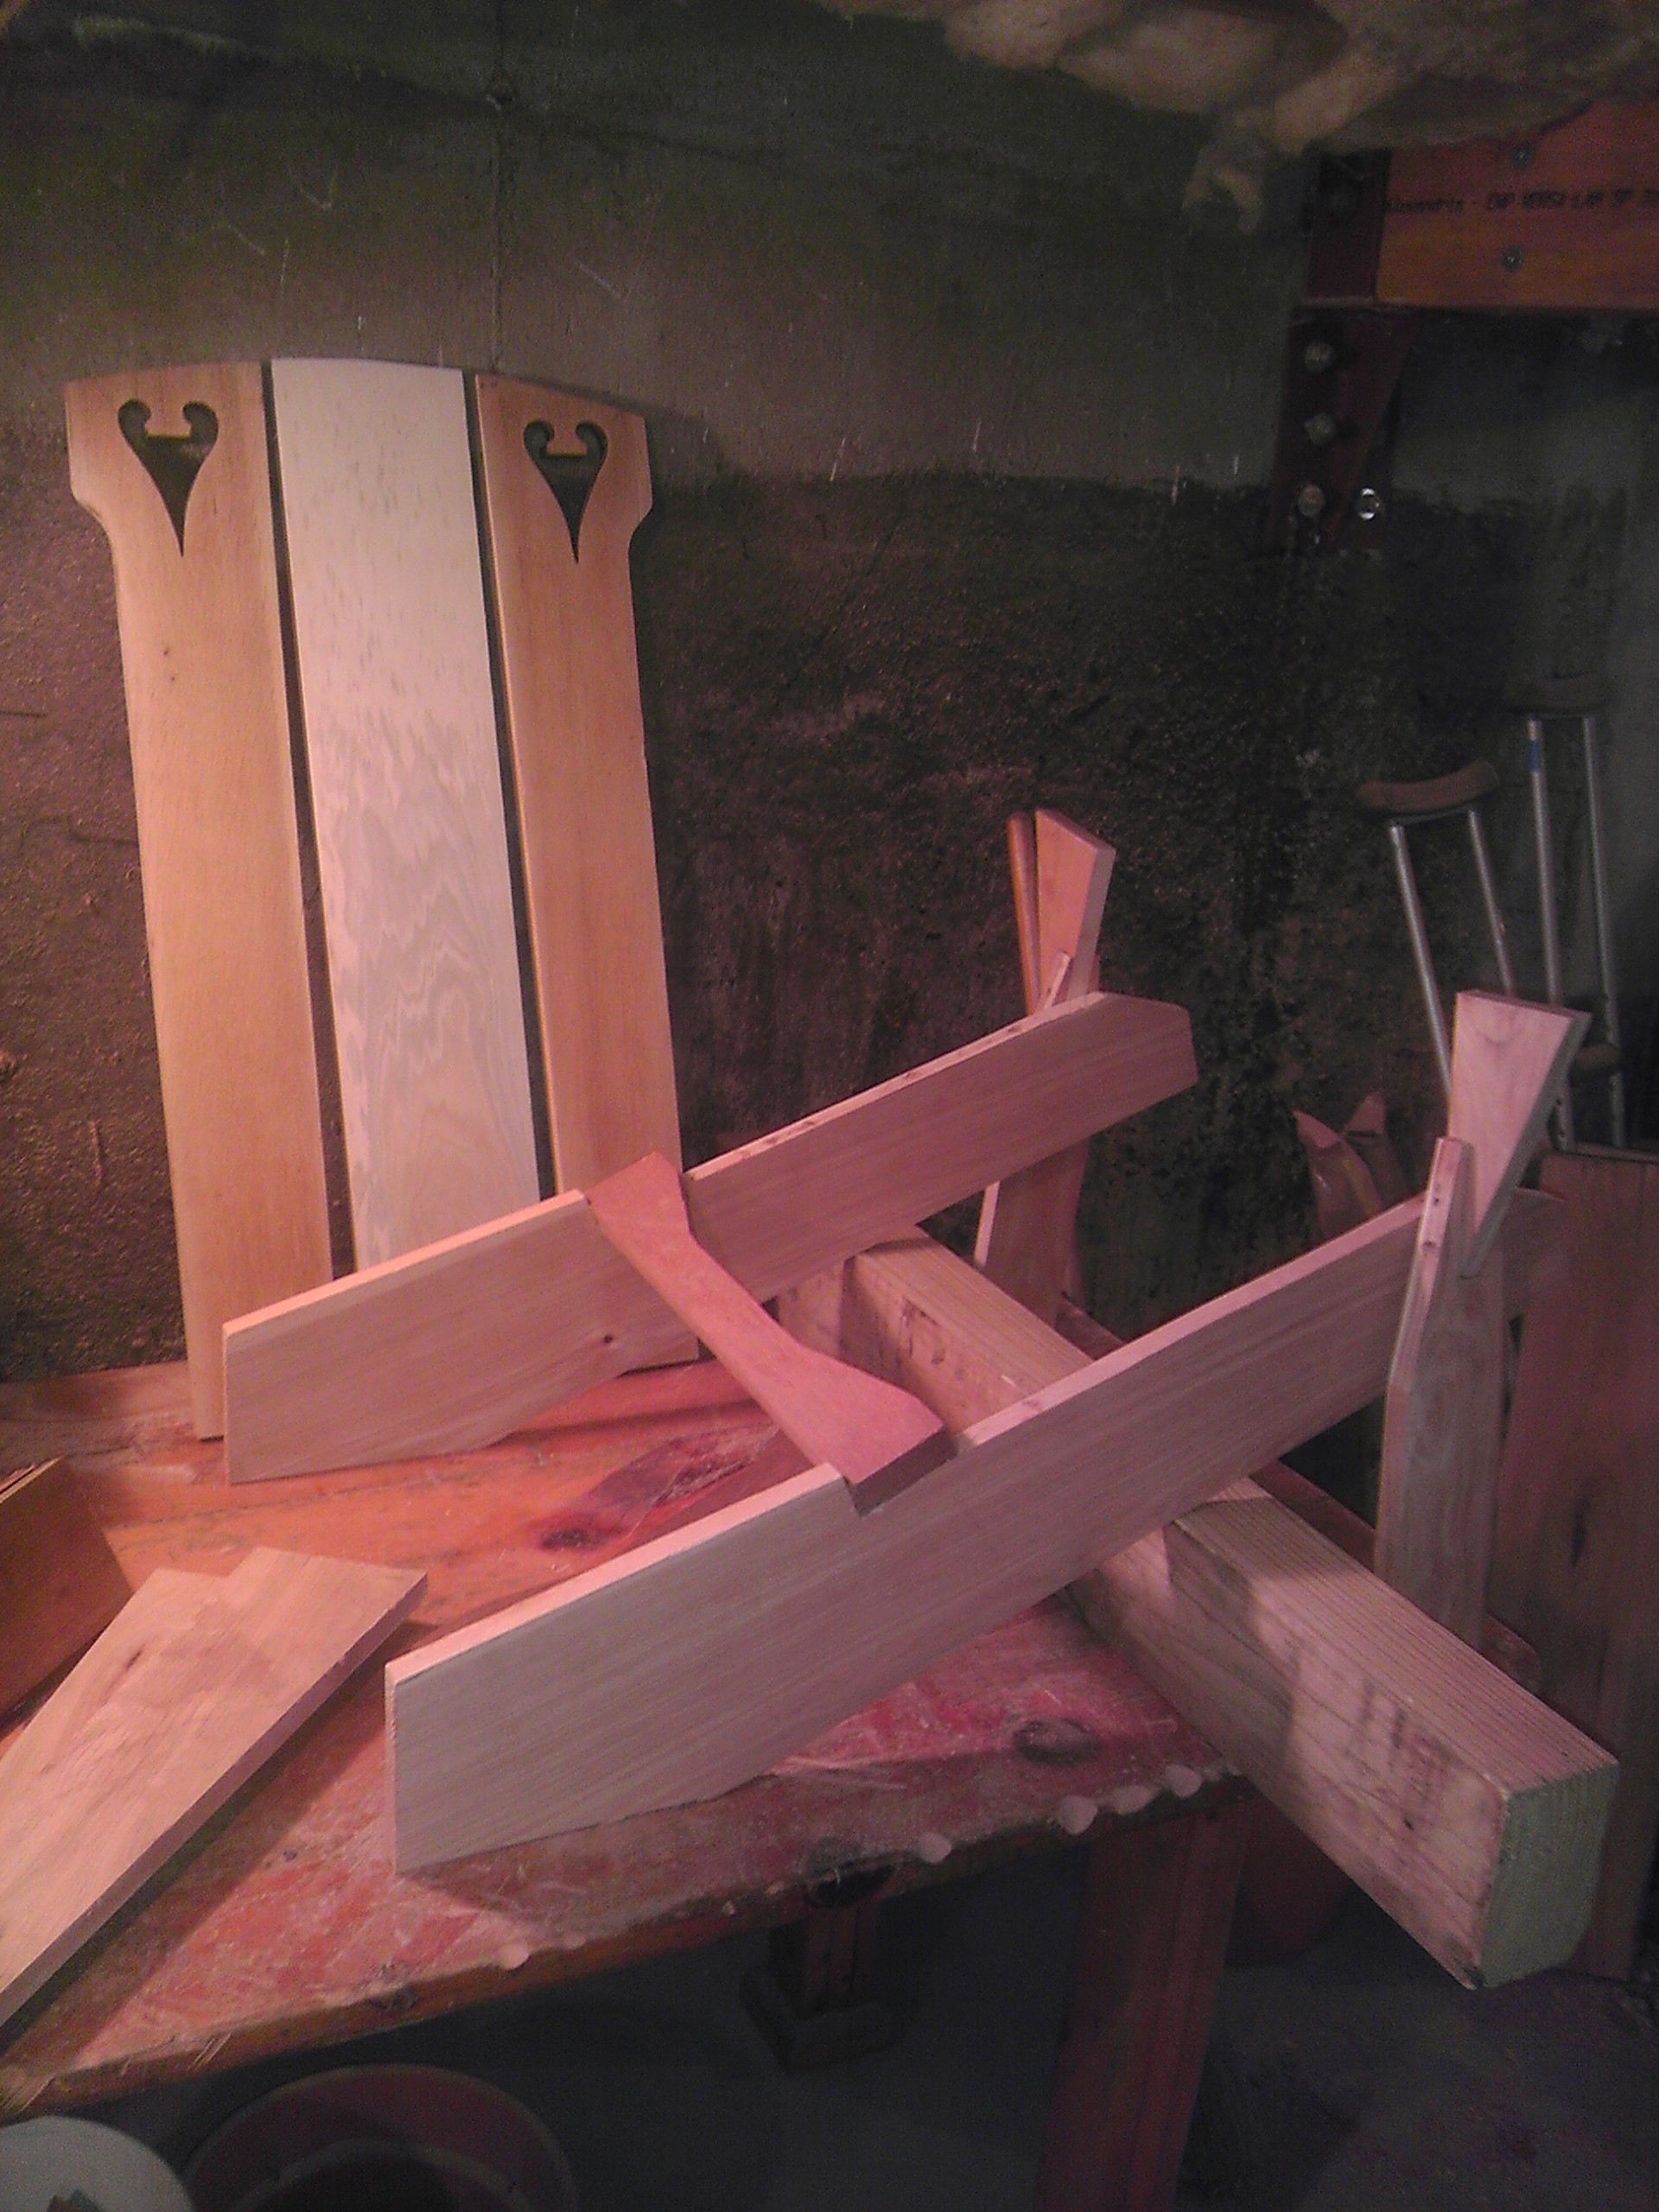
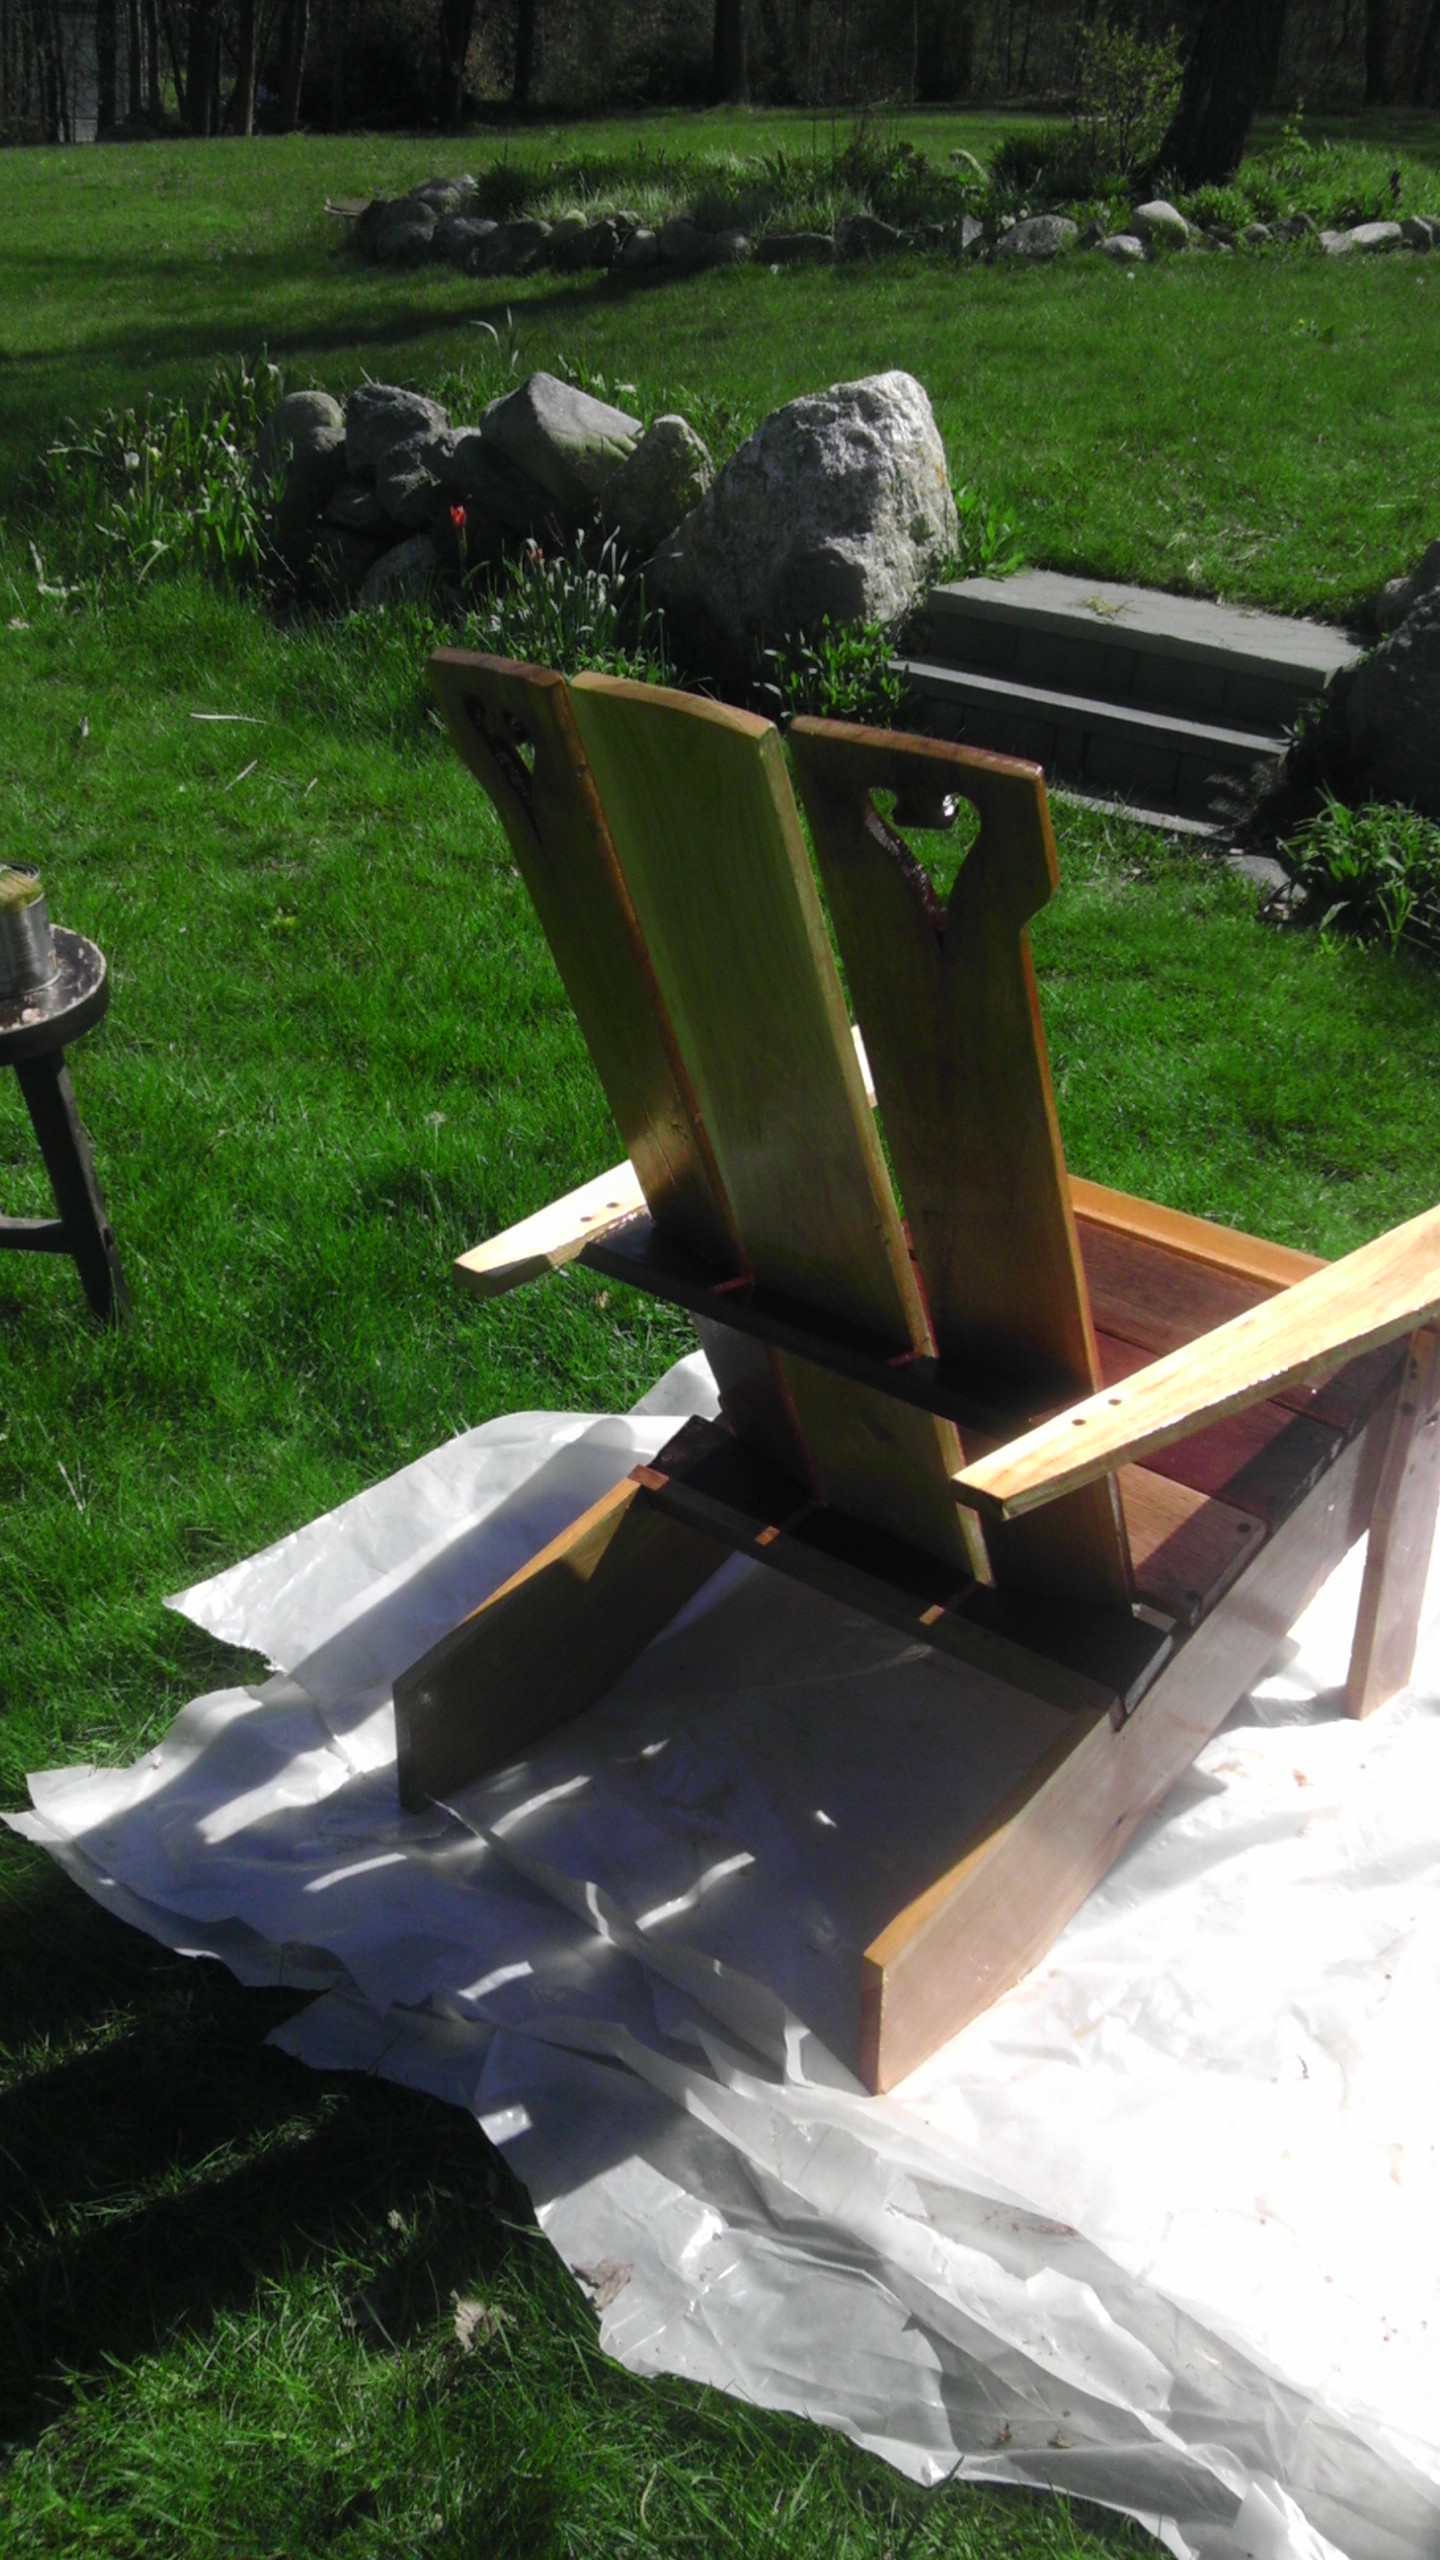
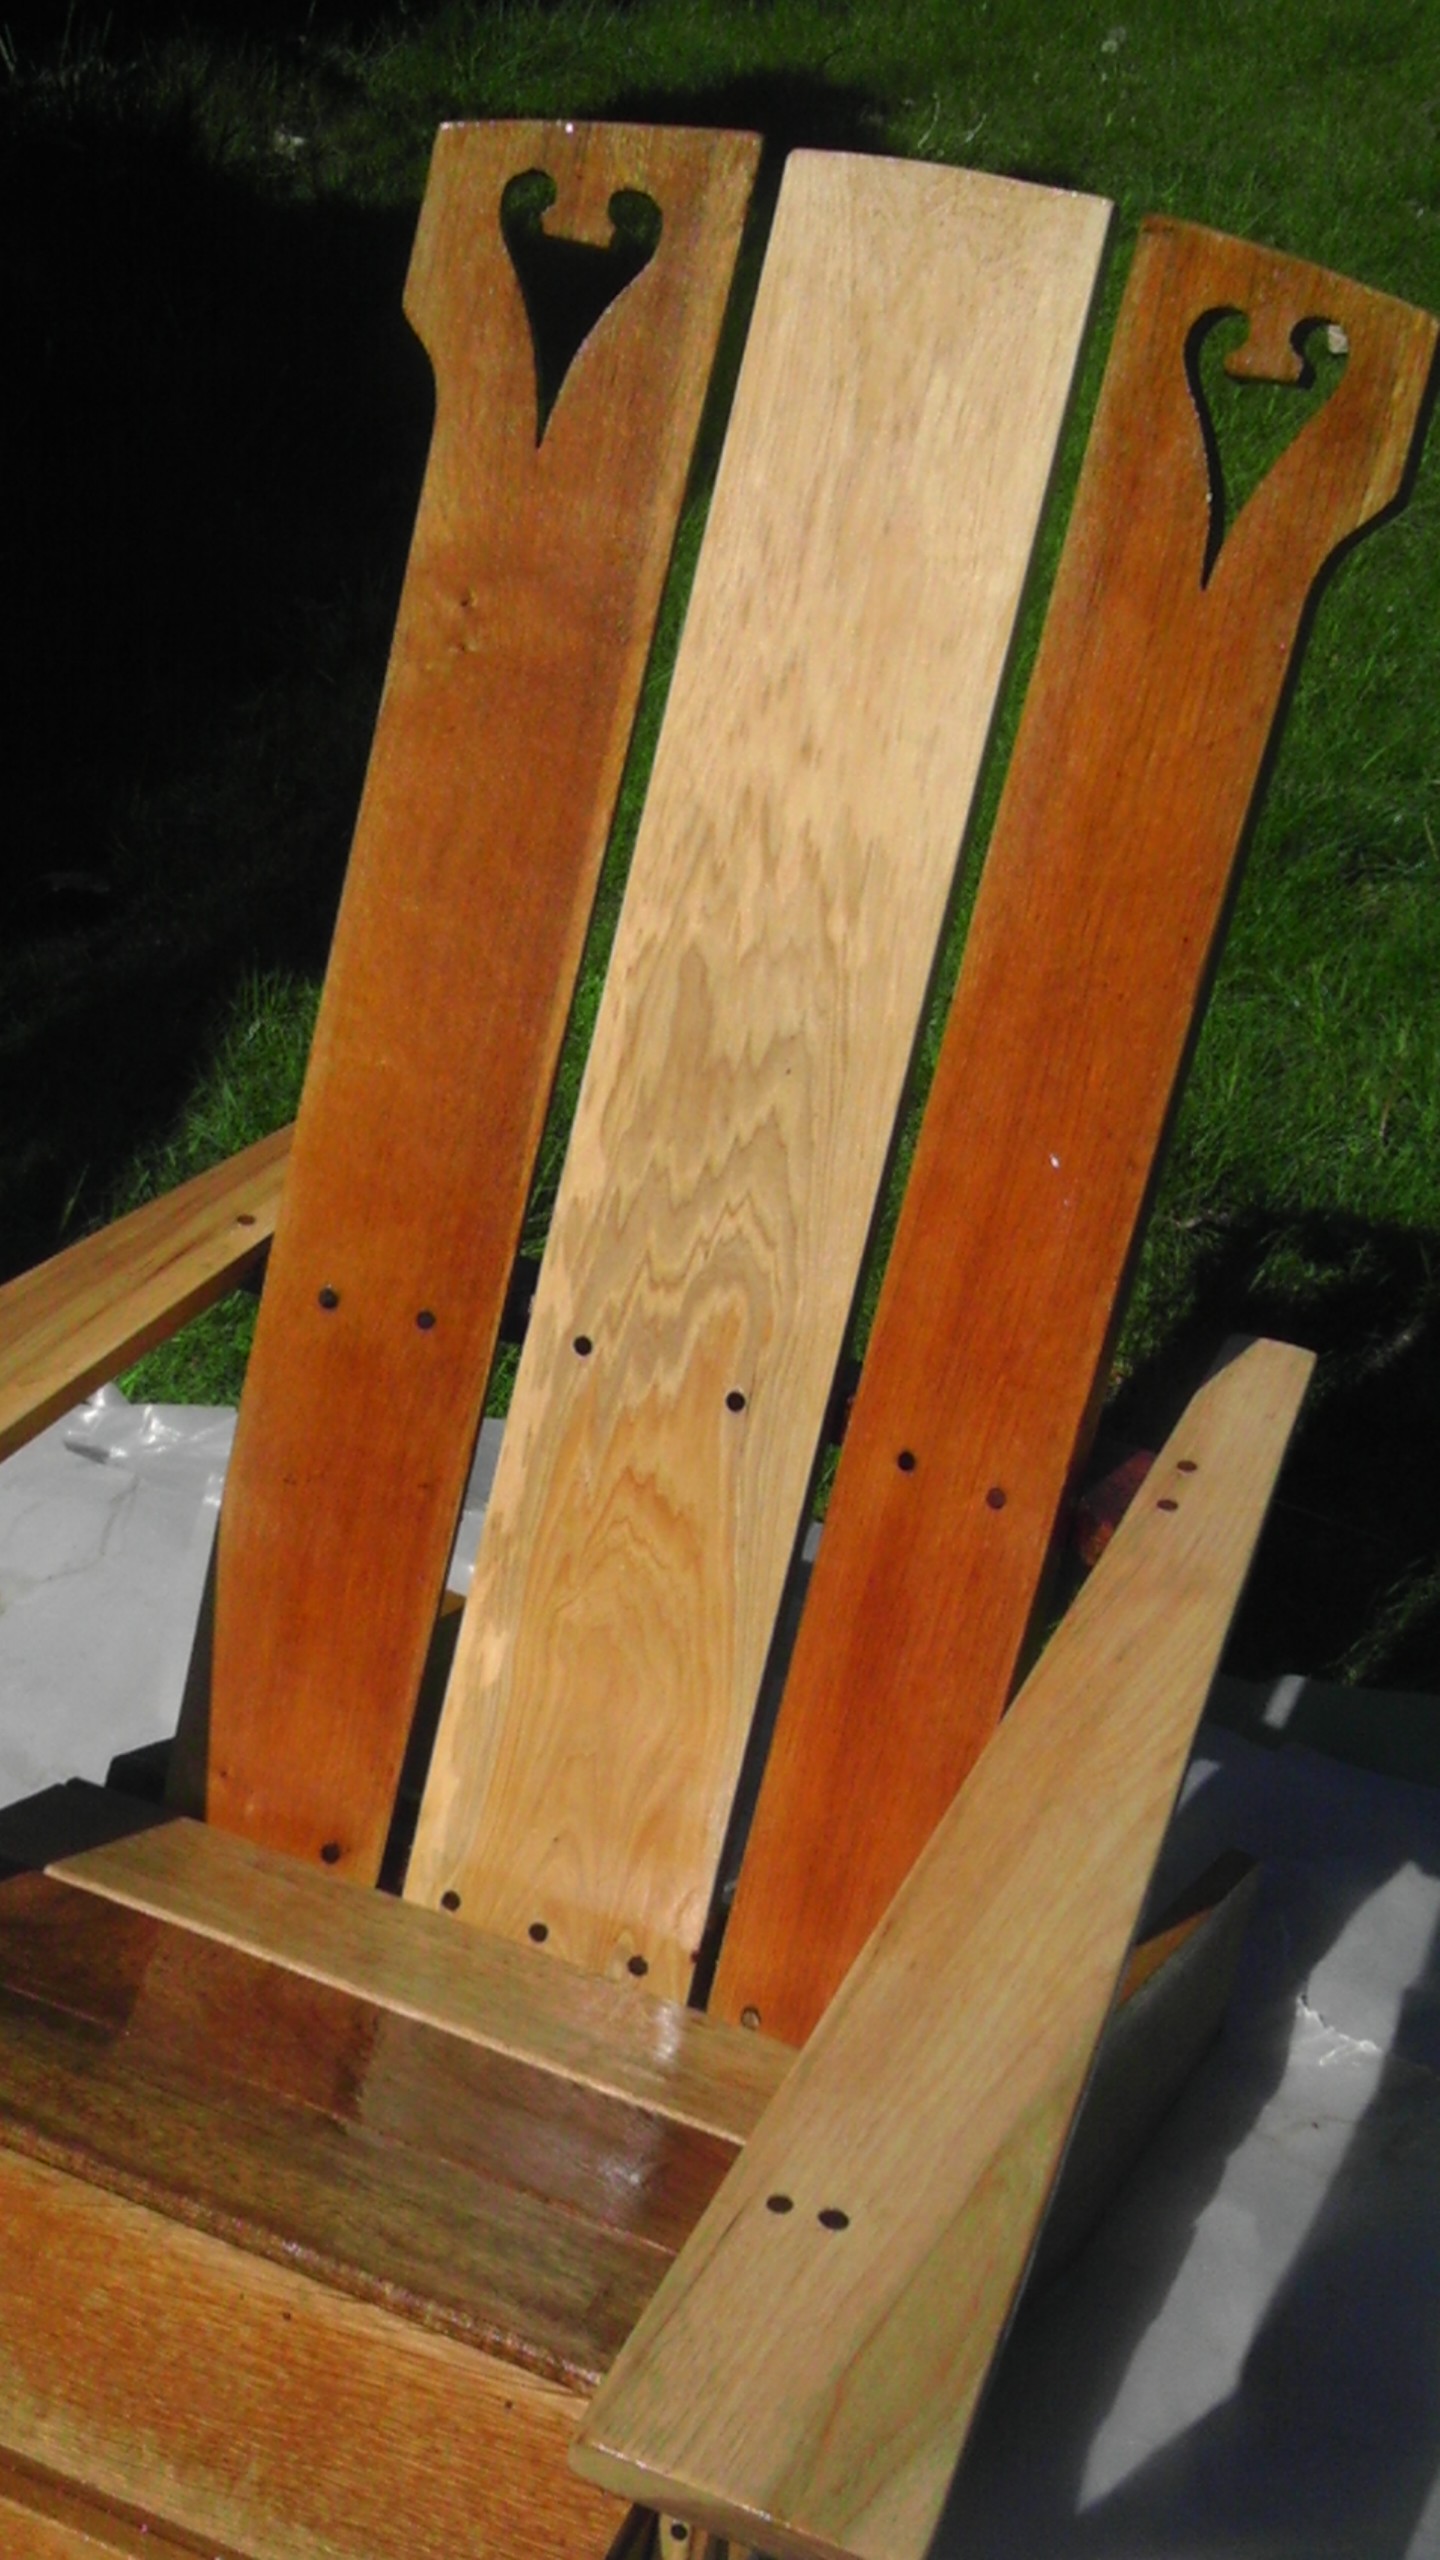
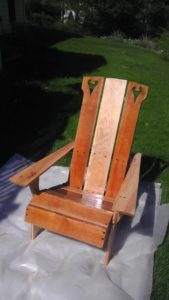
You can see a three piece back (the carve outs on the outside pieces were there in the oak cabinet but at the bottom, so here they are inverted).  That piece in the center is a piece of hickory, the only not up-cycled piece in the assemblage.  It was selected for the grain.  We’ll come back to that.  An Adirondack chair it was to be and I made some legs that I thought nicely addressed the need to be flush to the long leg base but perpendicular to the arm.  No nails or screws in this baby.  Is there a word for that?

Chair 1 - Rough Leg

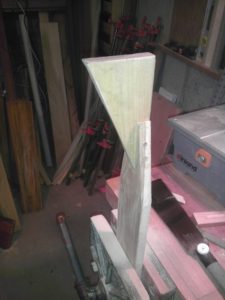
Anyway, I selected, cut out, and planed the five seat slats.  Two of that cabinet oak, three random, of which one was perhaps butternut and the other two I have no idea.  Suddenly though, about August 2013 the project goes fallow.  I had so many irons in the fire, gourd banjos, gourd mbiras, oaken pliers, making the shop more capable, also I had a regular and sometimes intense work life too, and also I was intimidated by the joint I had selected for where the arms meet surrounding the back – I’d decided that none of the commonly used props and supports were really needed, that it would be sleeker and cooler and better – but I was not sure, so I paused.

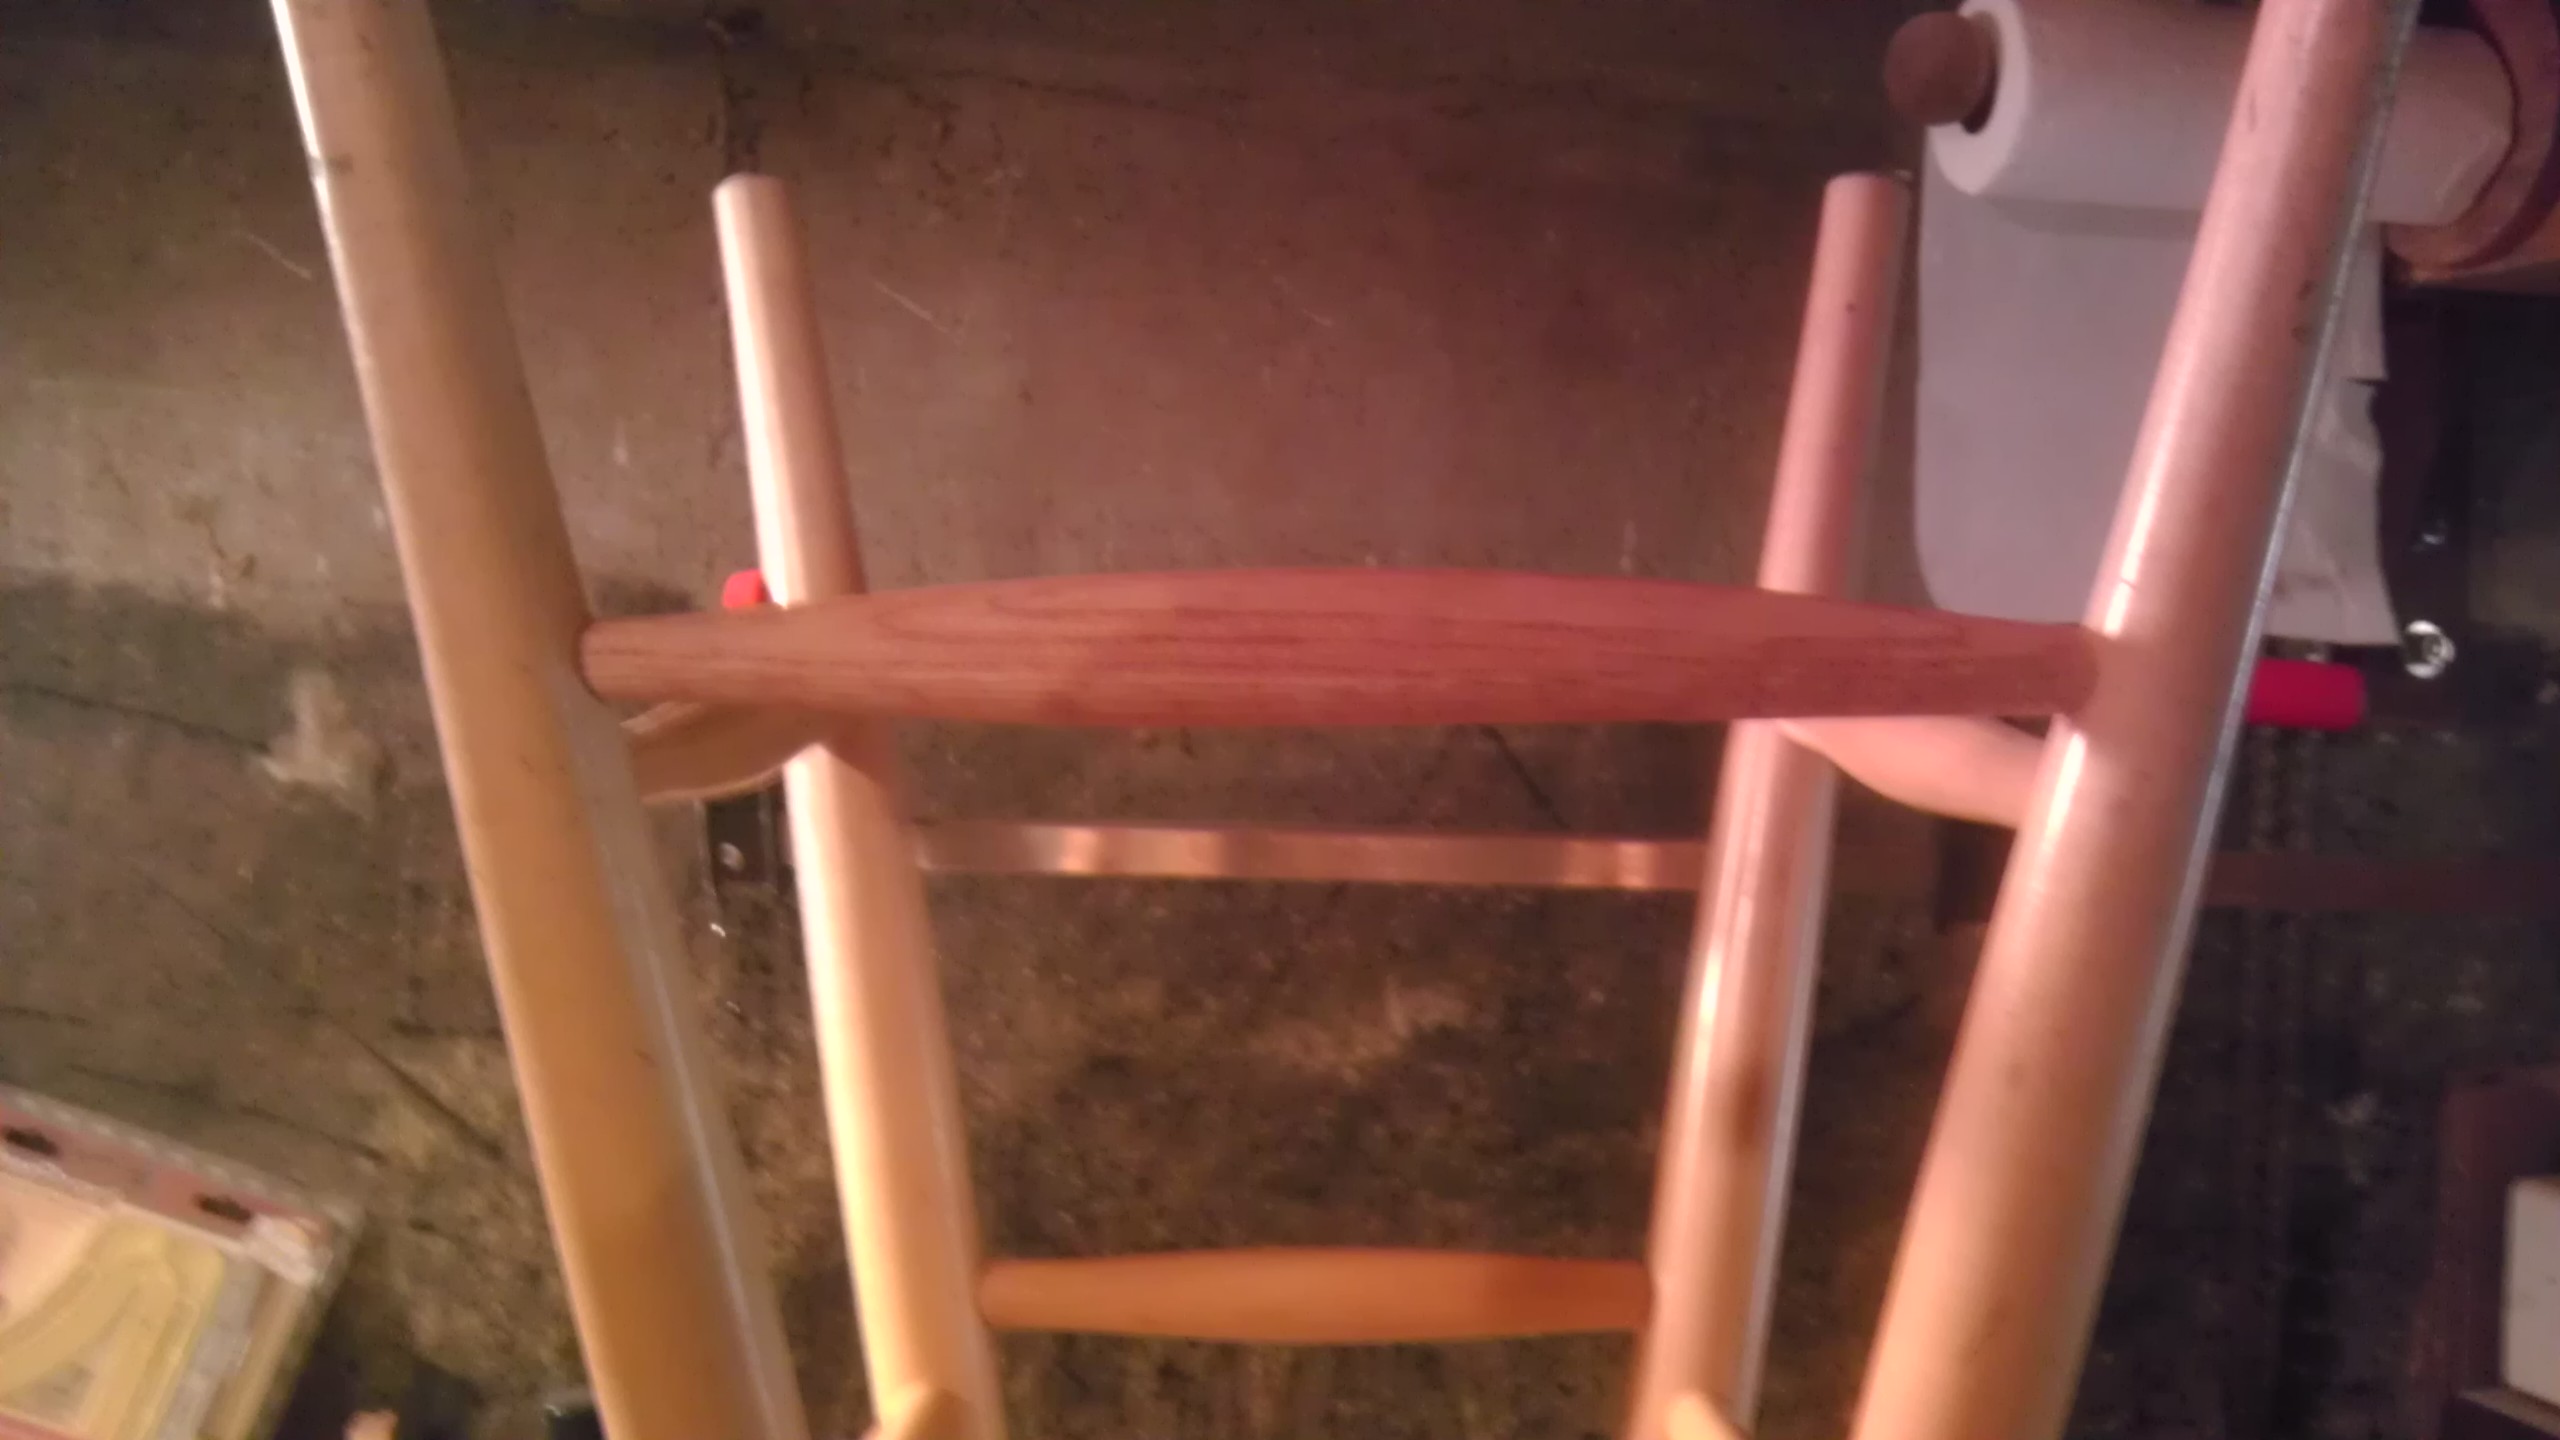
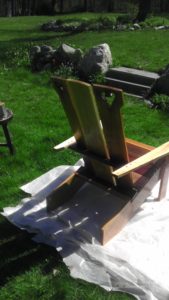
Fast forward two years.  The thing sat in the shop taunting me.  My nephew was going to be around for a few weeks and he’s a useful one.  He helped affix the slats (and adjust them as needed), work out some of the geometry in the arm joint plan, and get the back attached.  At the end of his contribution all that was really left was the attachment of the arms.

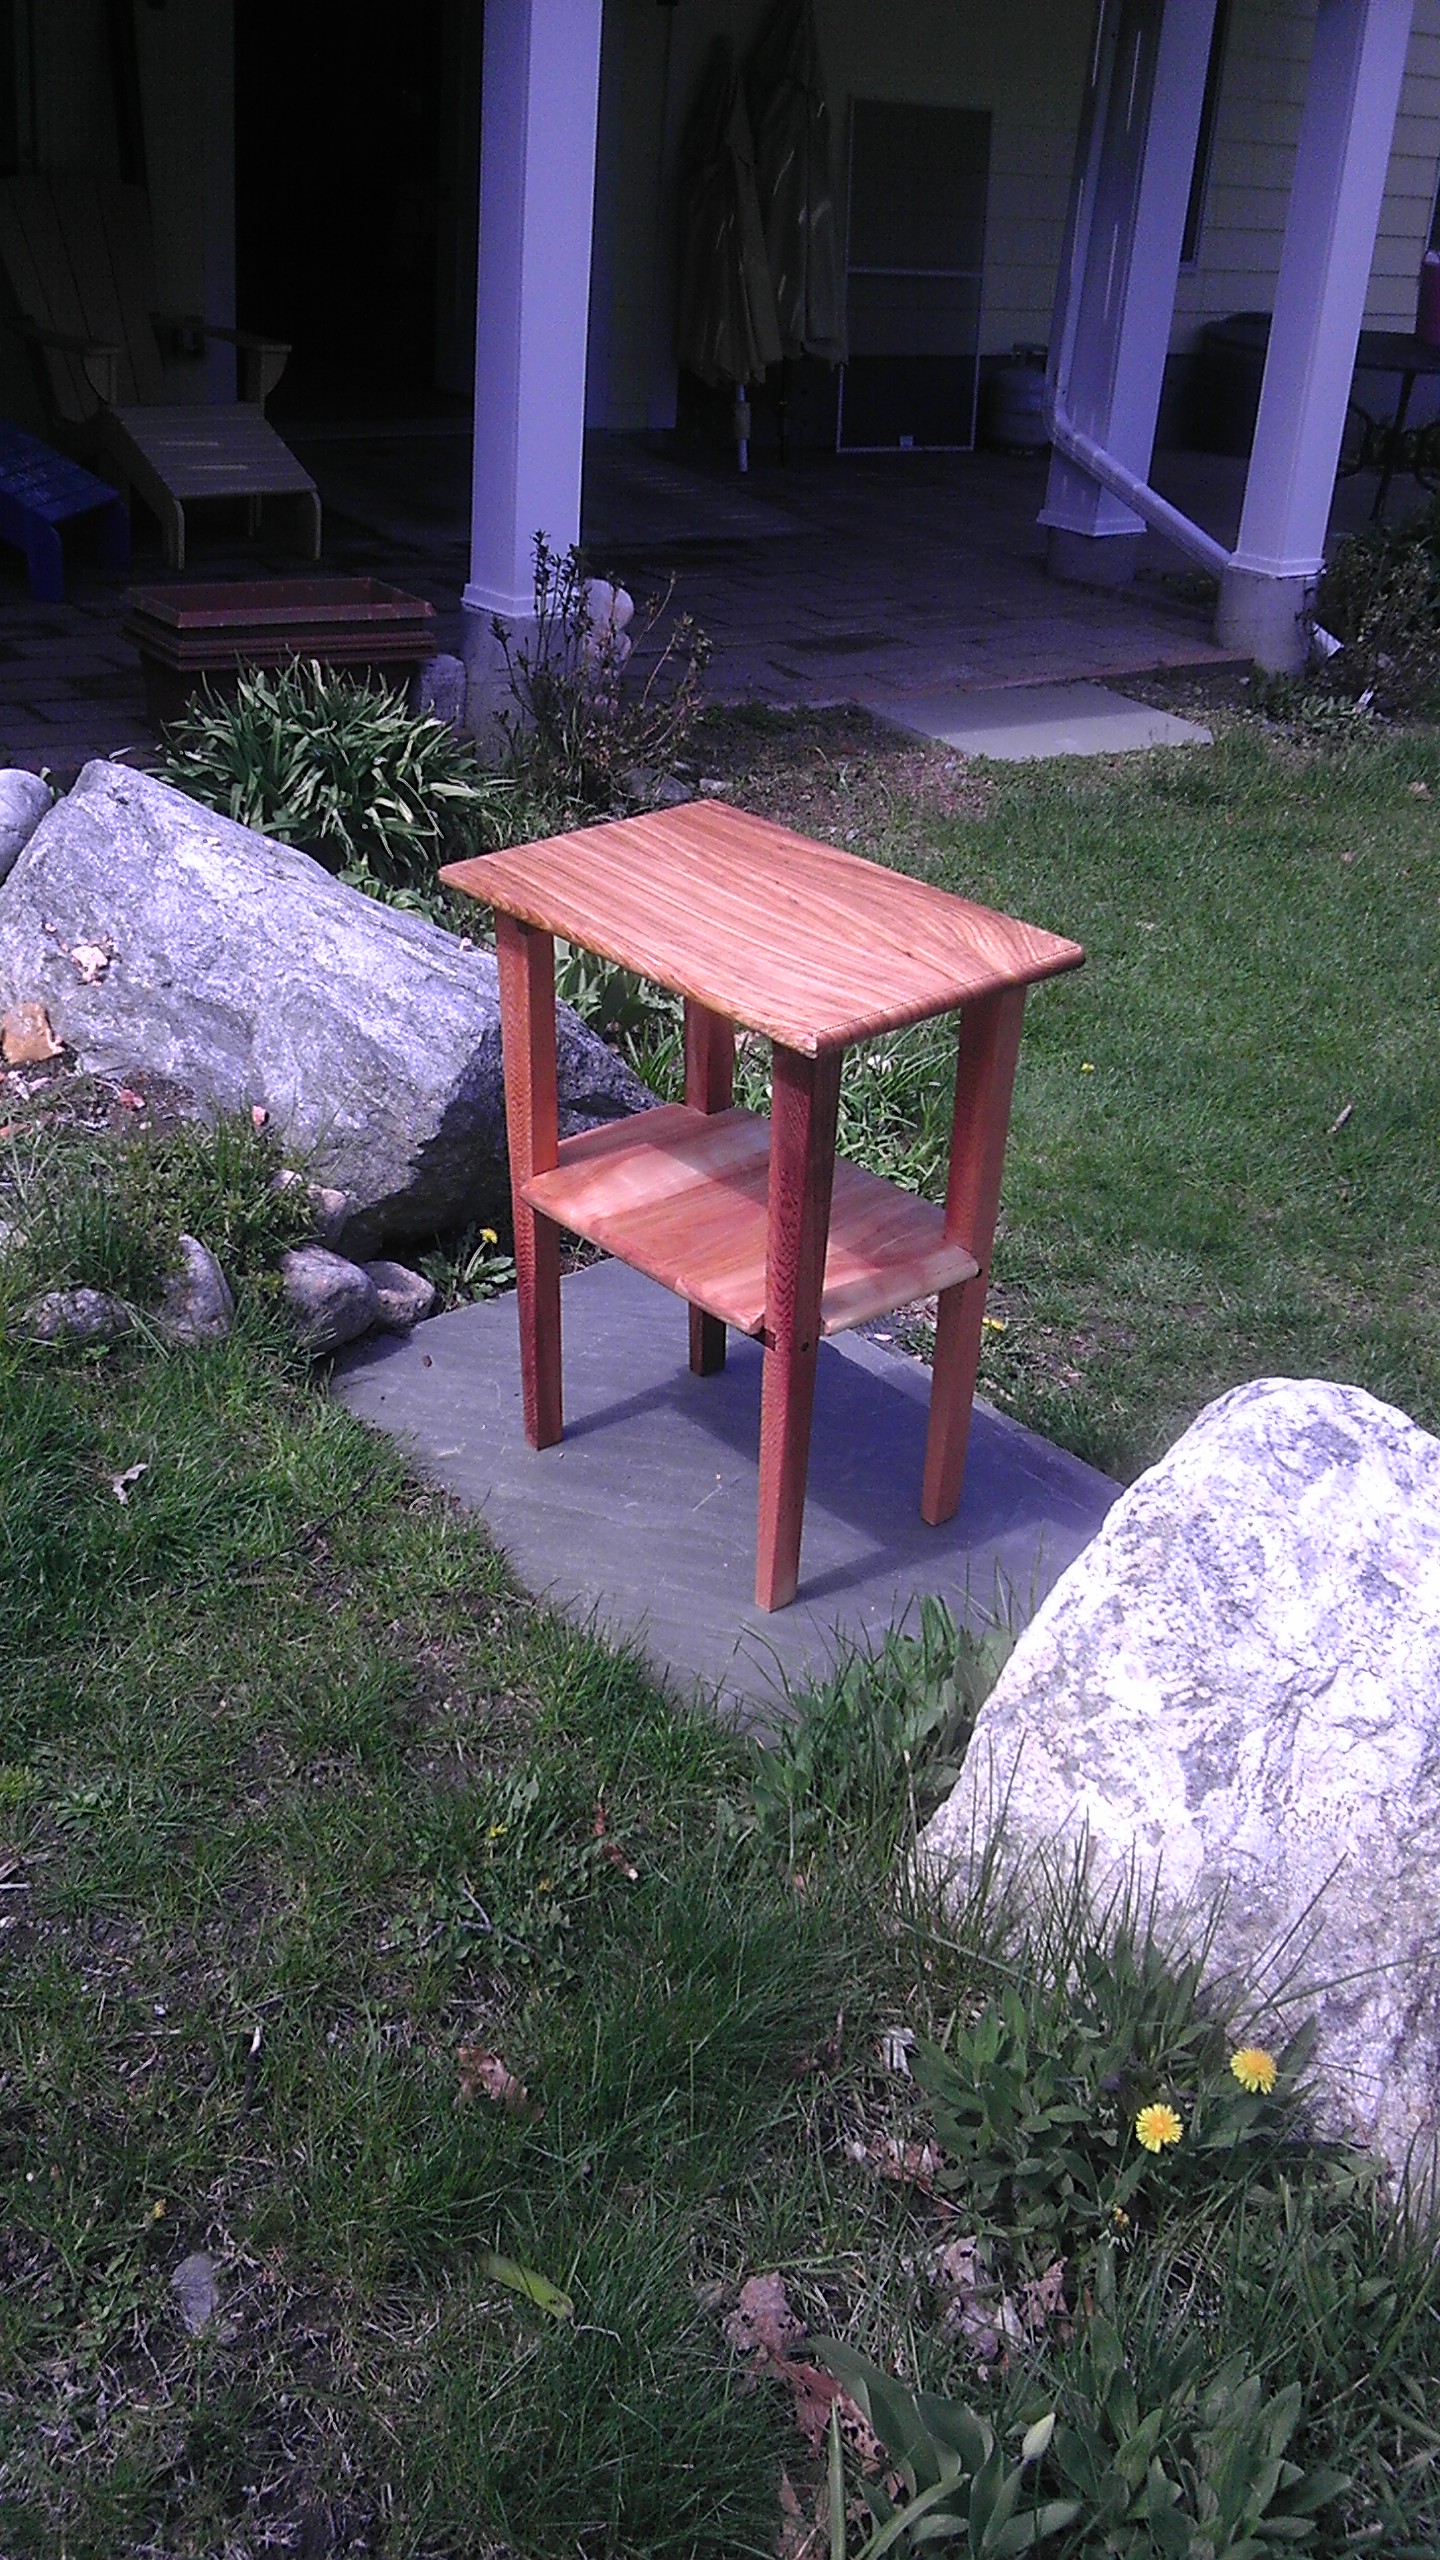
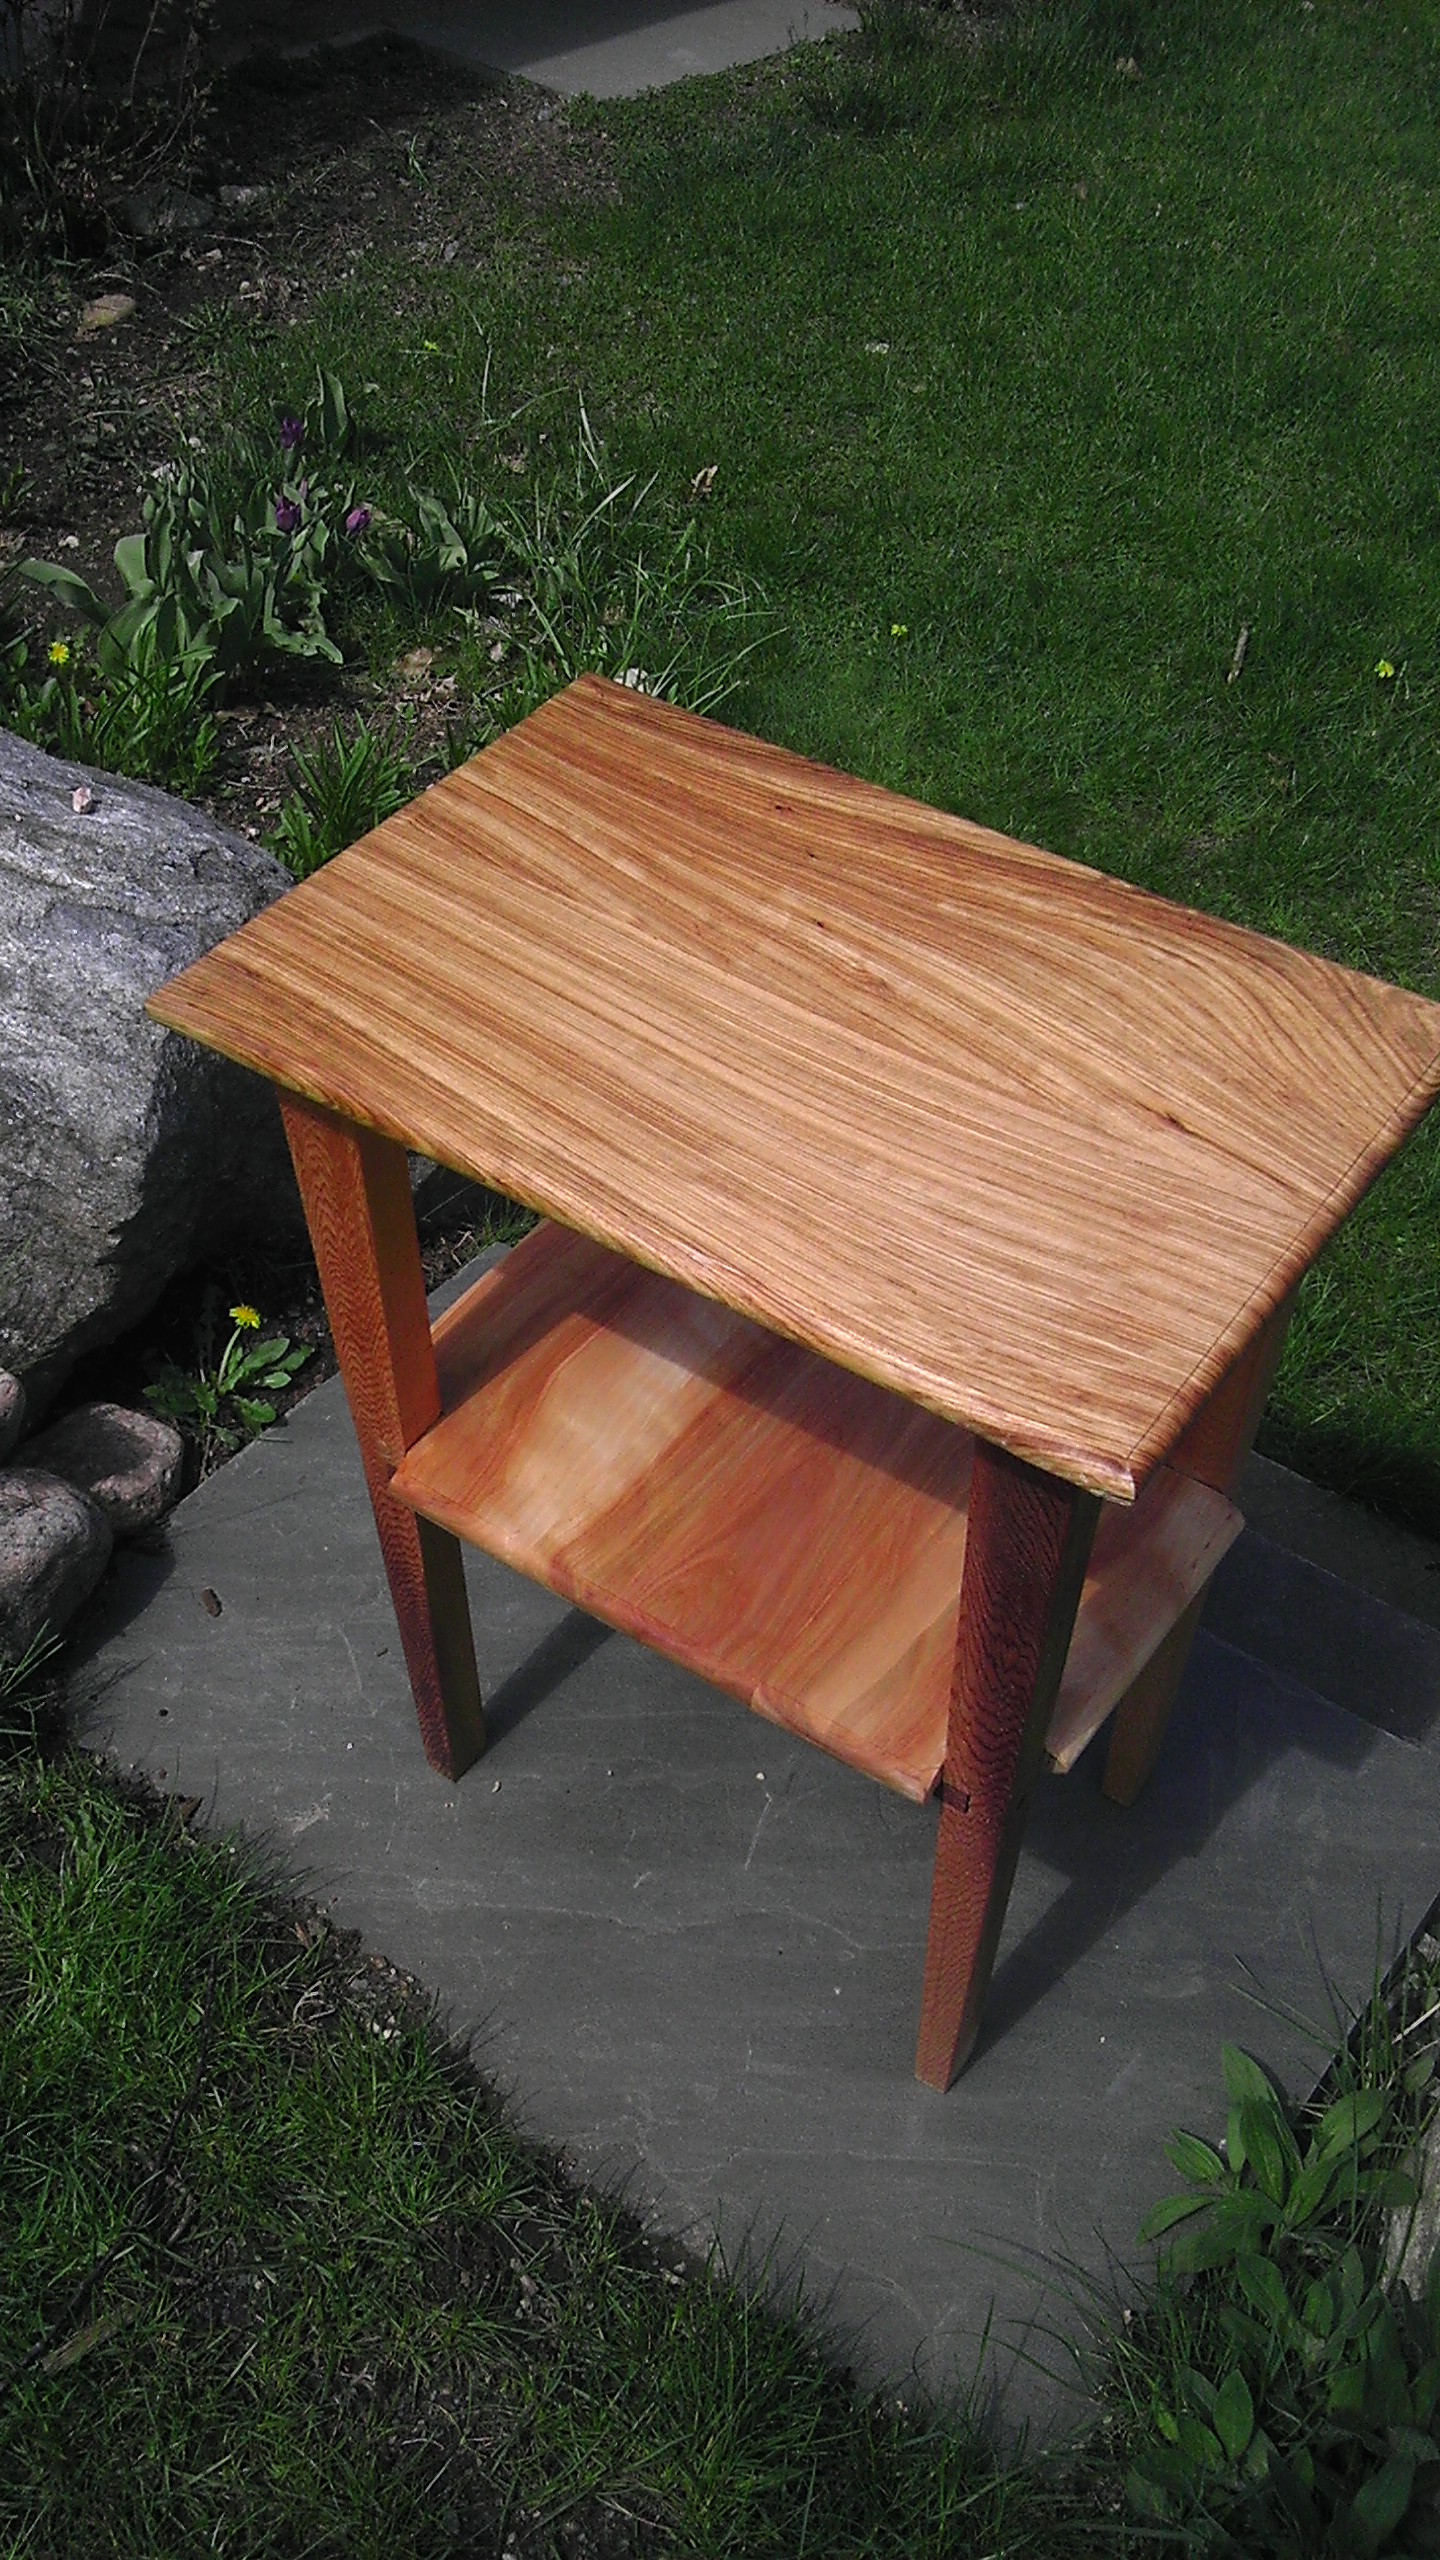
Fast forward eight months.  I have no idea how inertia is overcome, why things not in motion get into motion and things in motion cease to be in motion.  Is there a scientific word for this opposite of inertia?  It was right after the completion of the table, which came out nicely and filled me with confidence, that I put it up next.

Chair 1 - Right Chair 1 - Left Chair 1 - Center

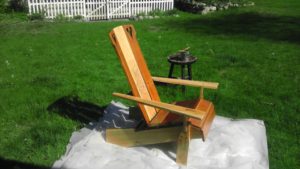
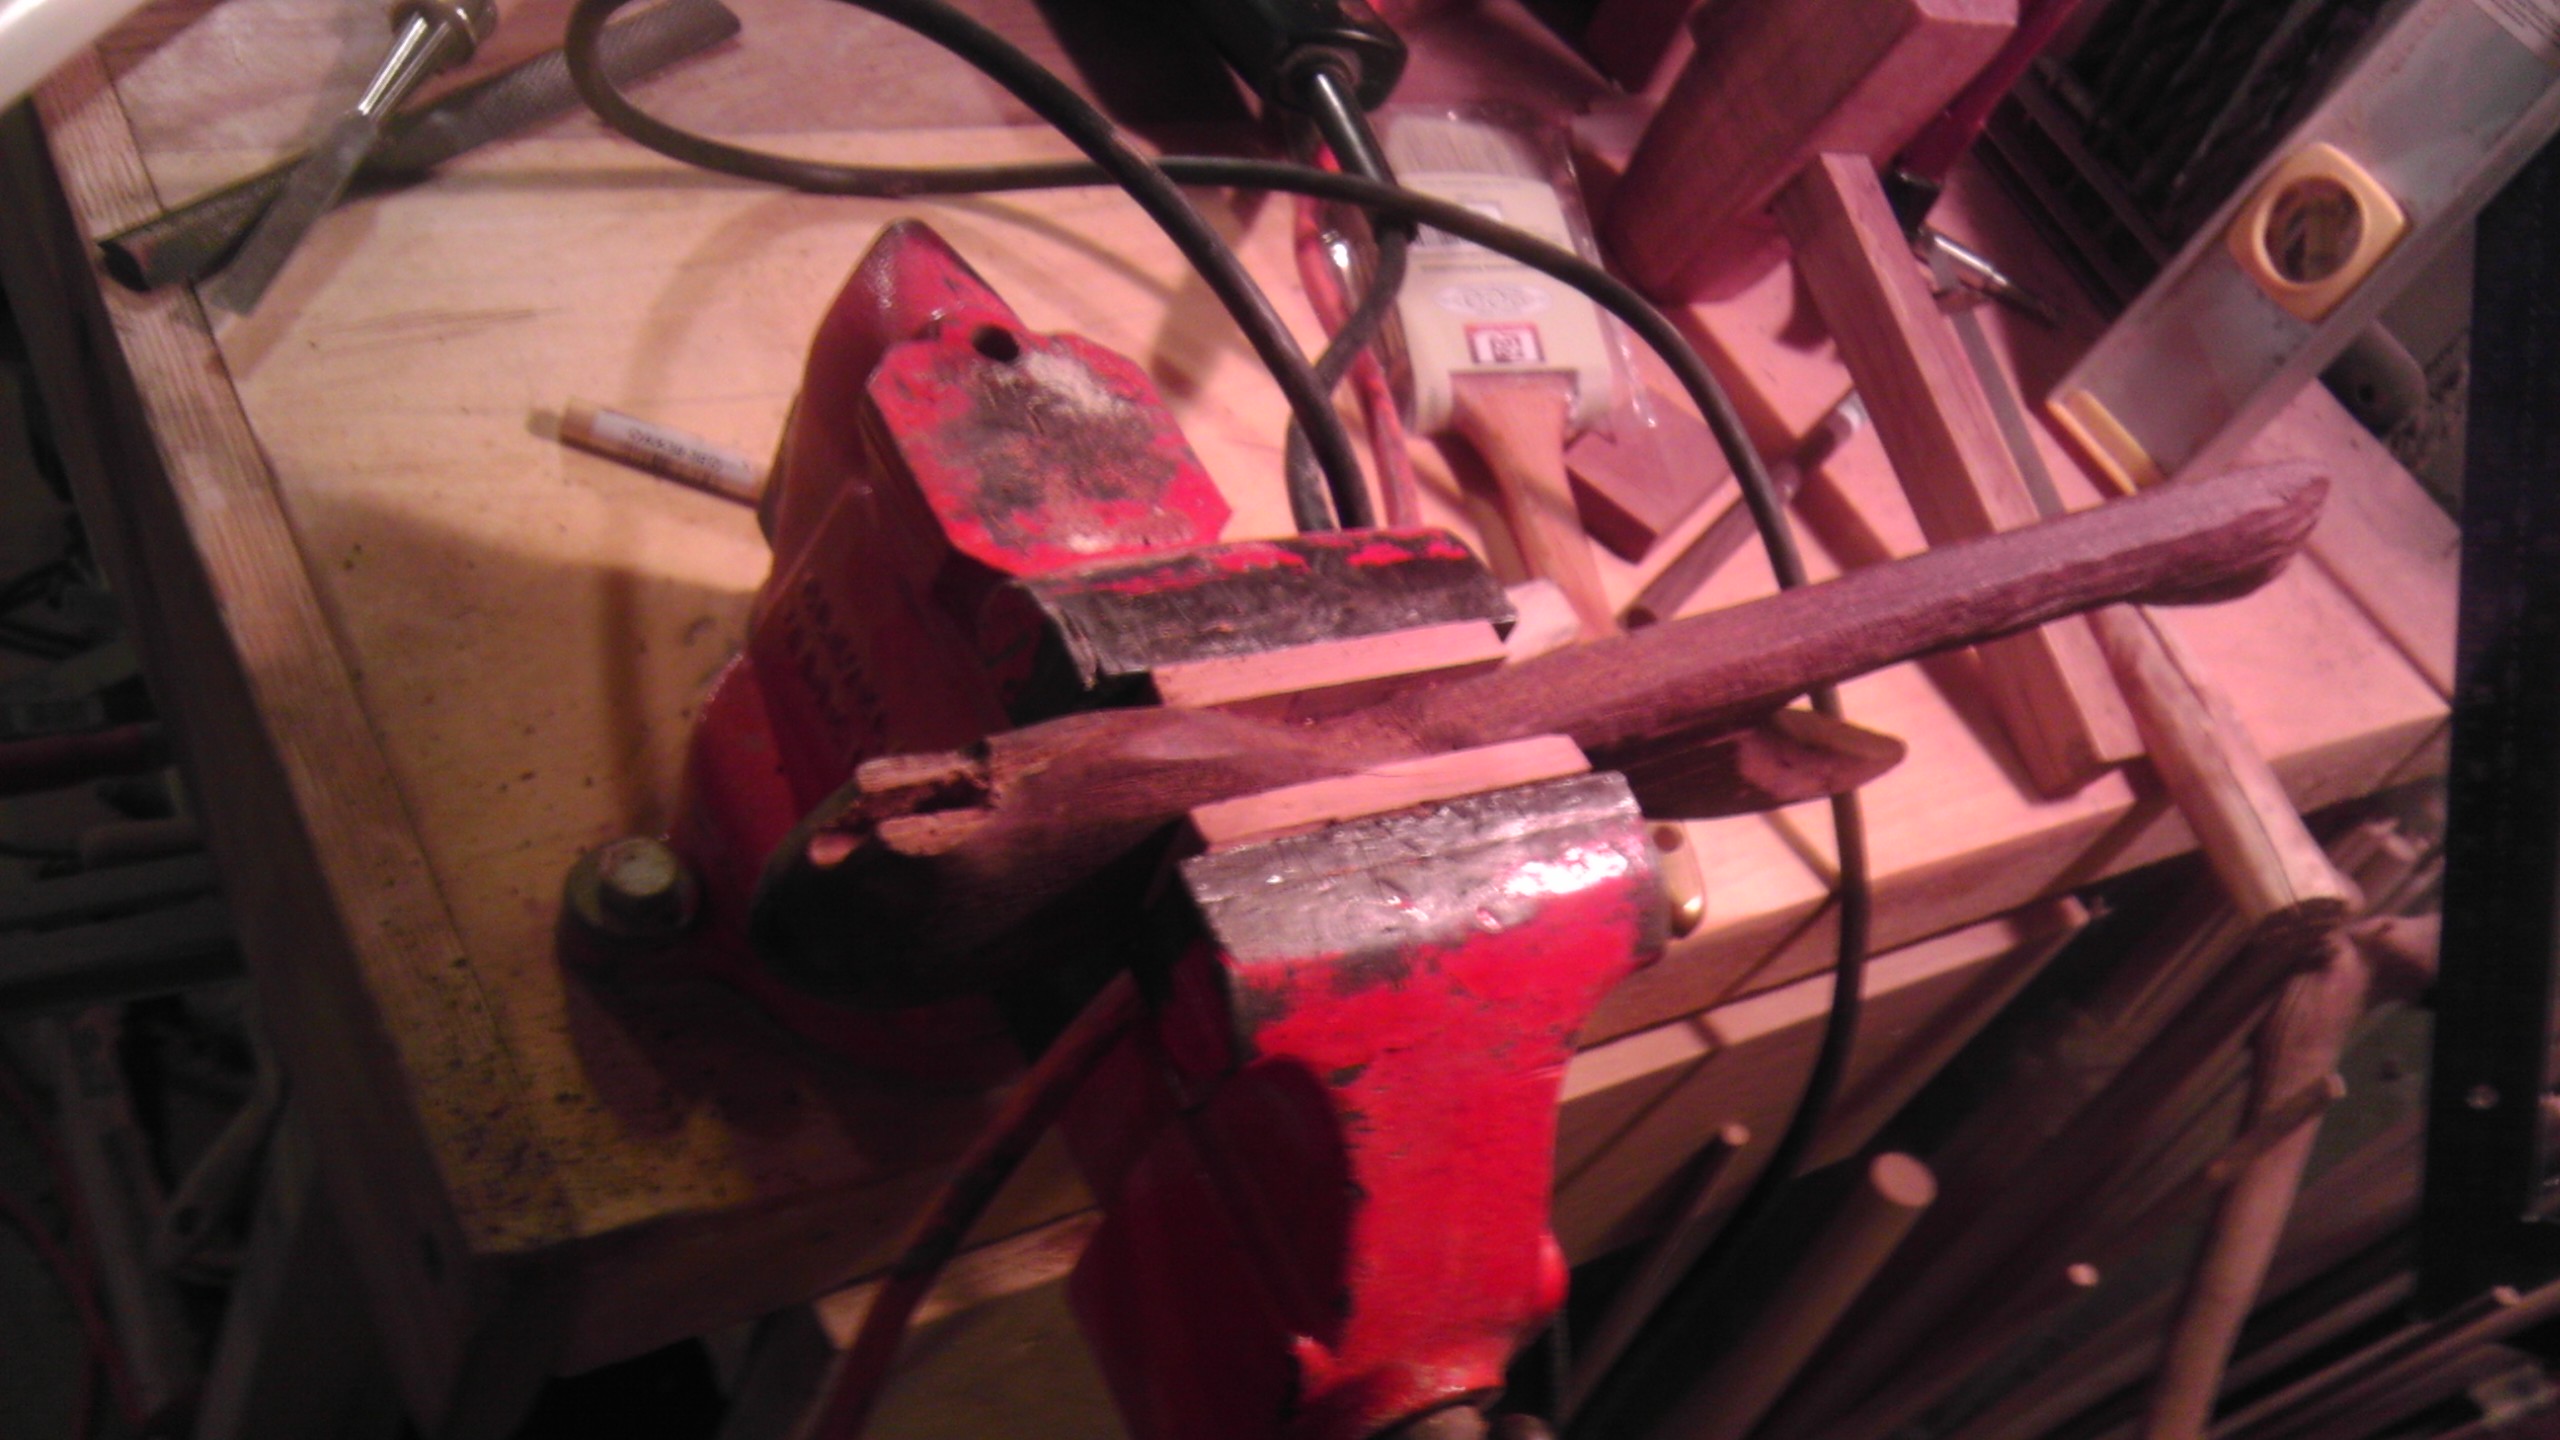
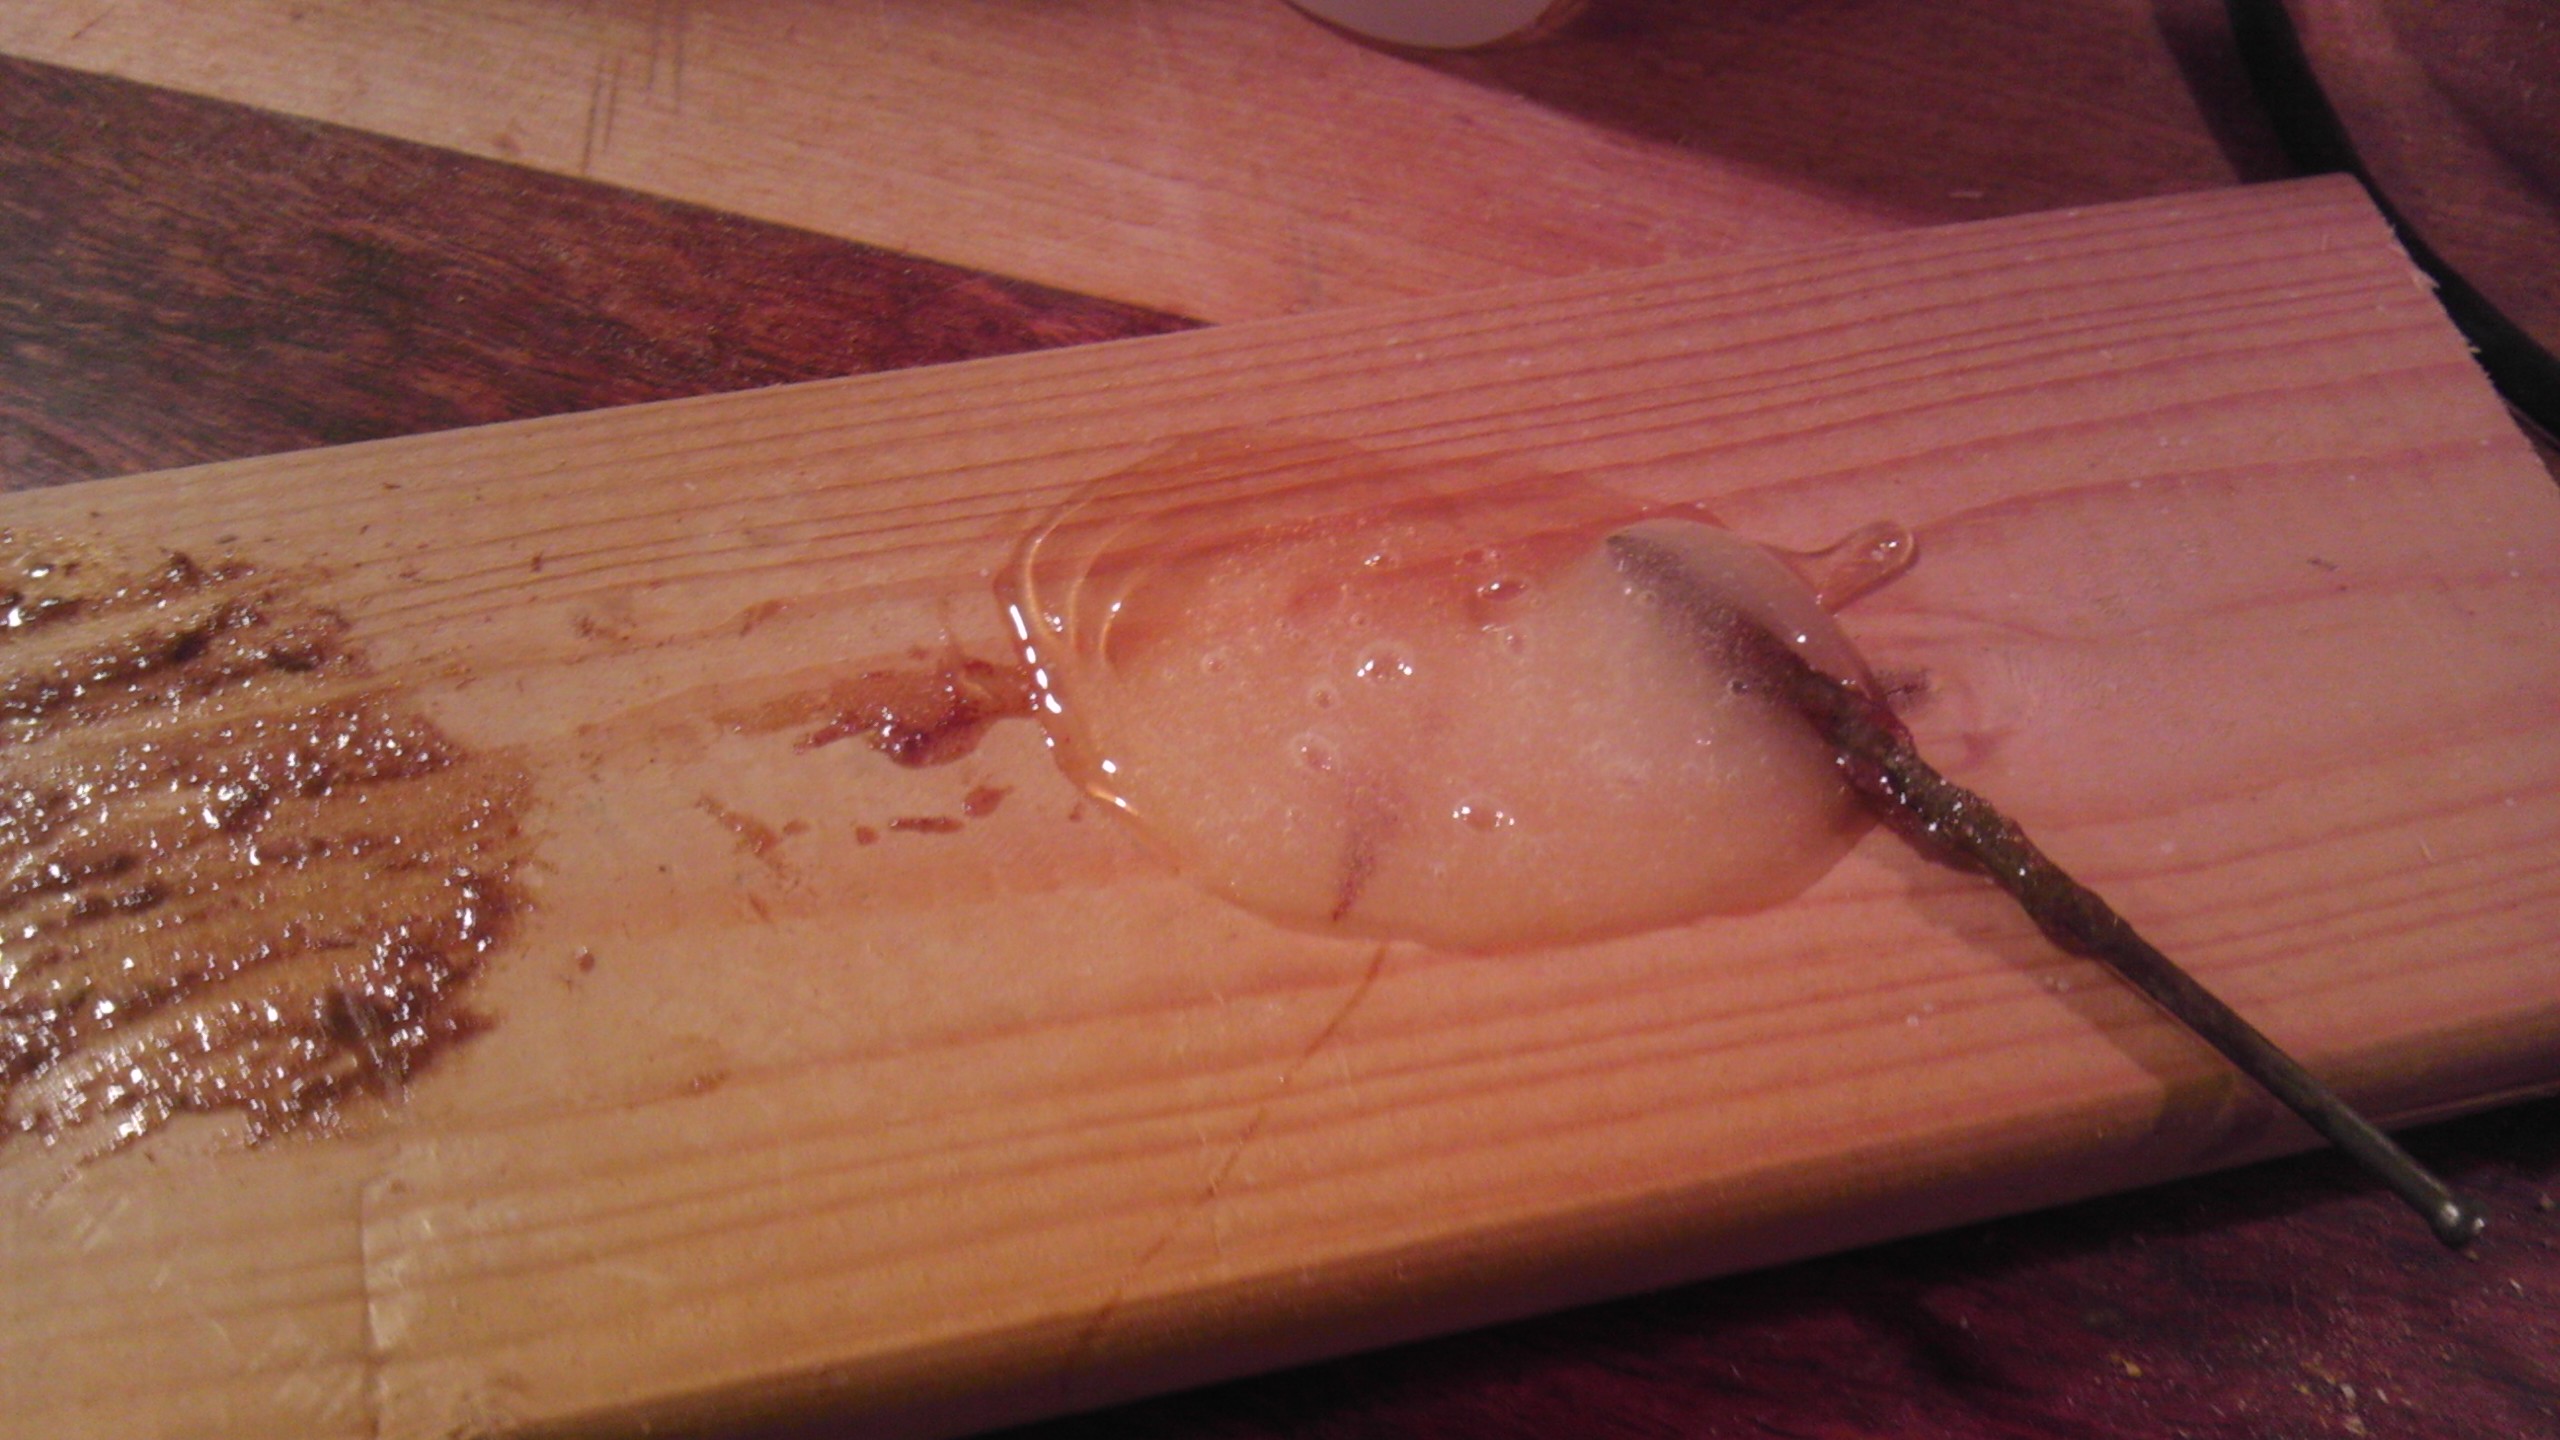
I used a marine spar varnish, which seemed the right thing if this is to live outside.  It came out strong.  I used epoxy-resin on the joints where the arms join to the back piece and where the arms join to the legs.  These struck me as the joints subject to the most stress and having the least mechanical advantage.

Chair 1 - Back

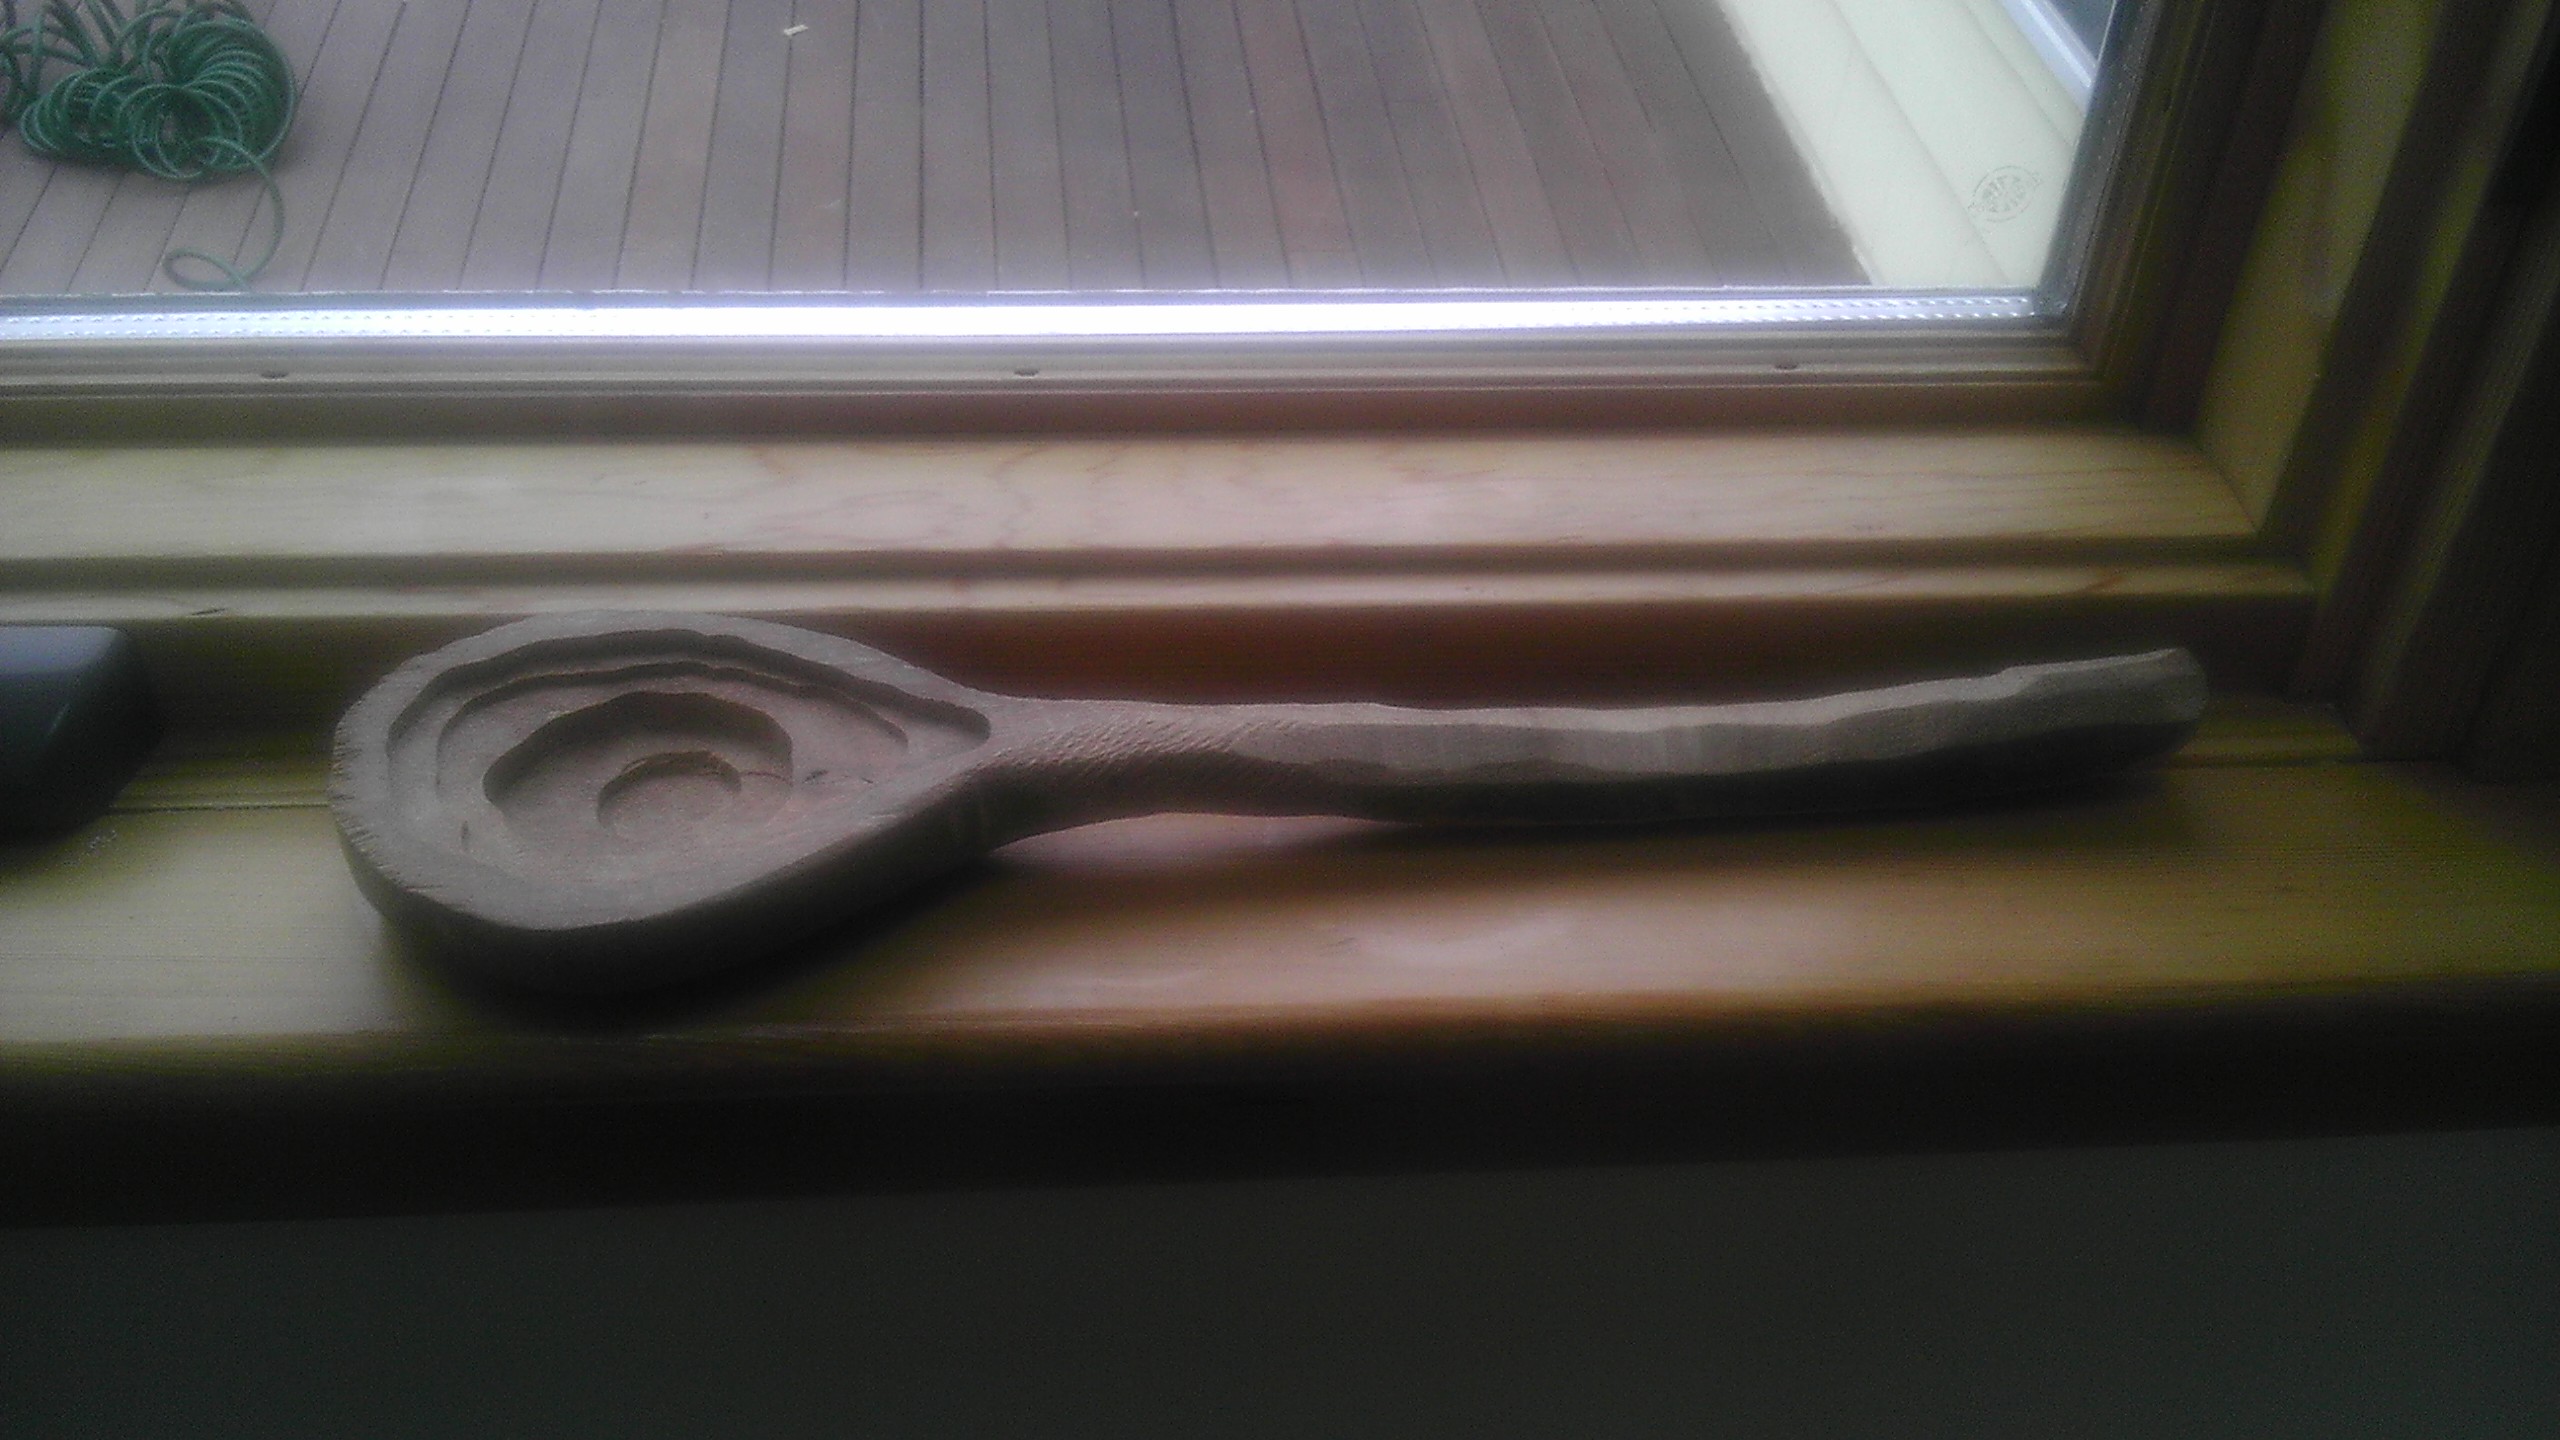
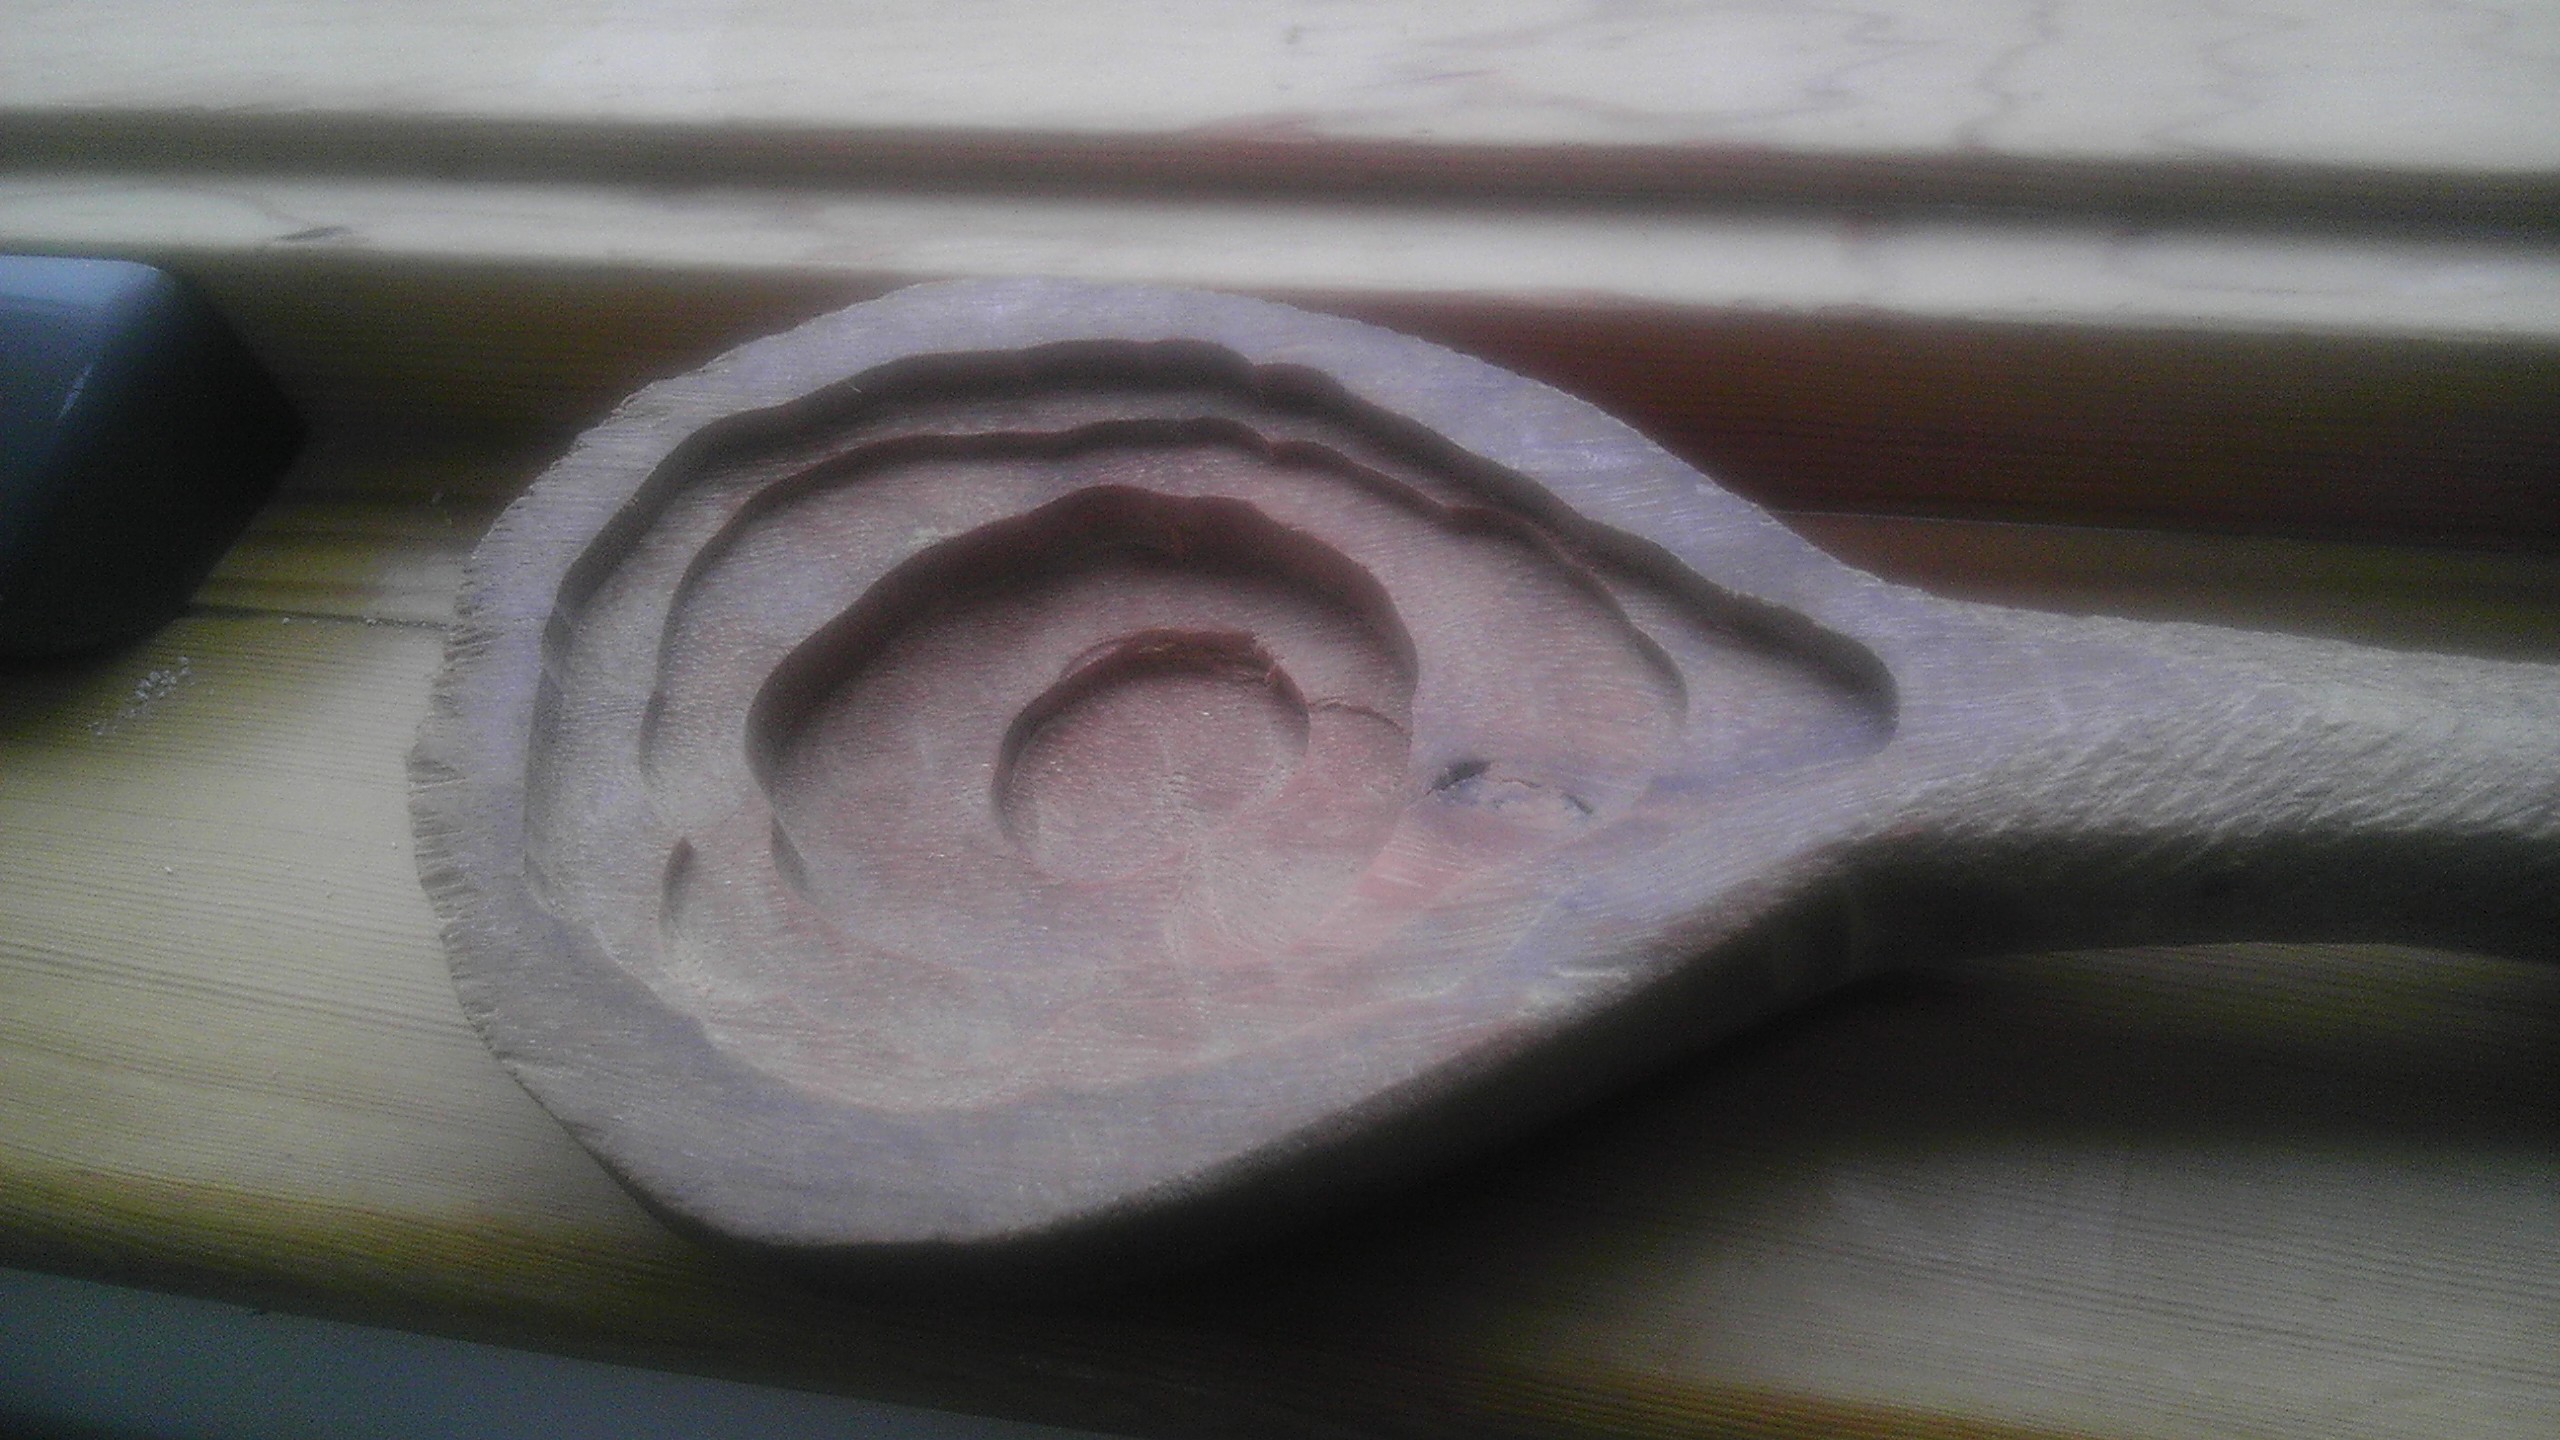
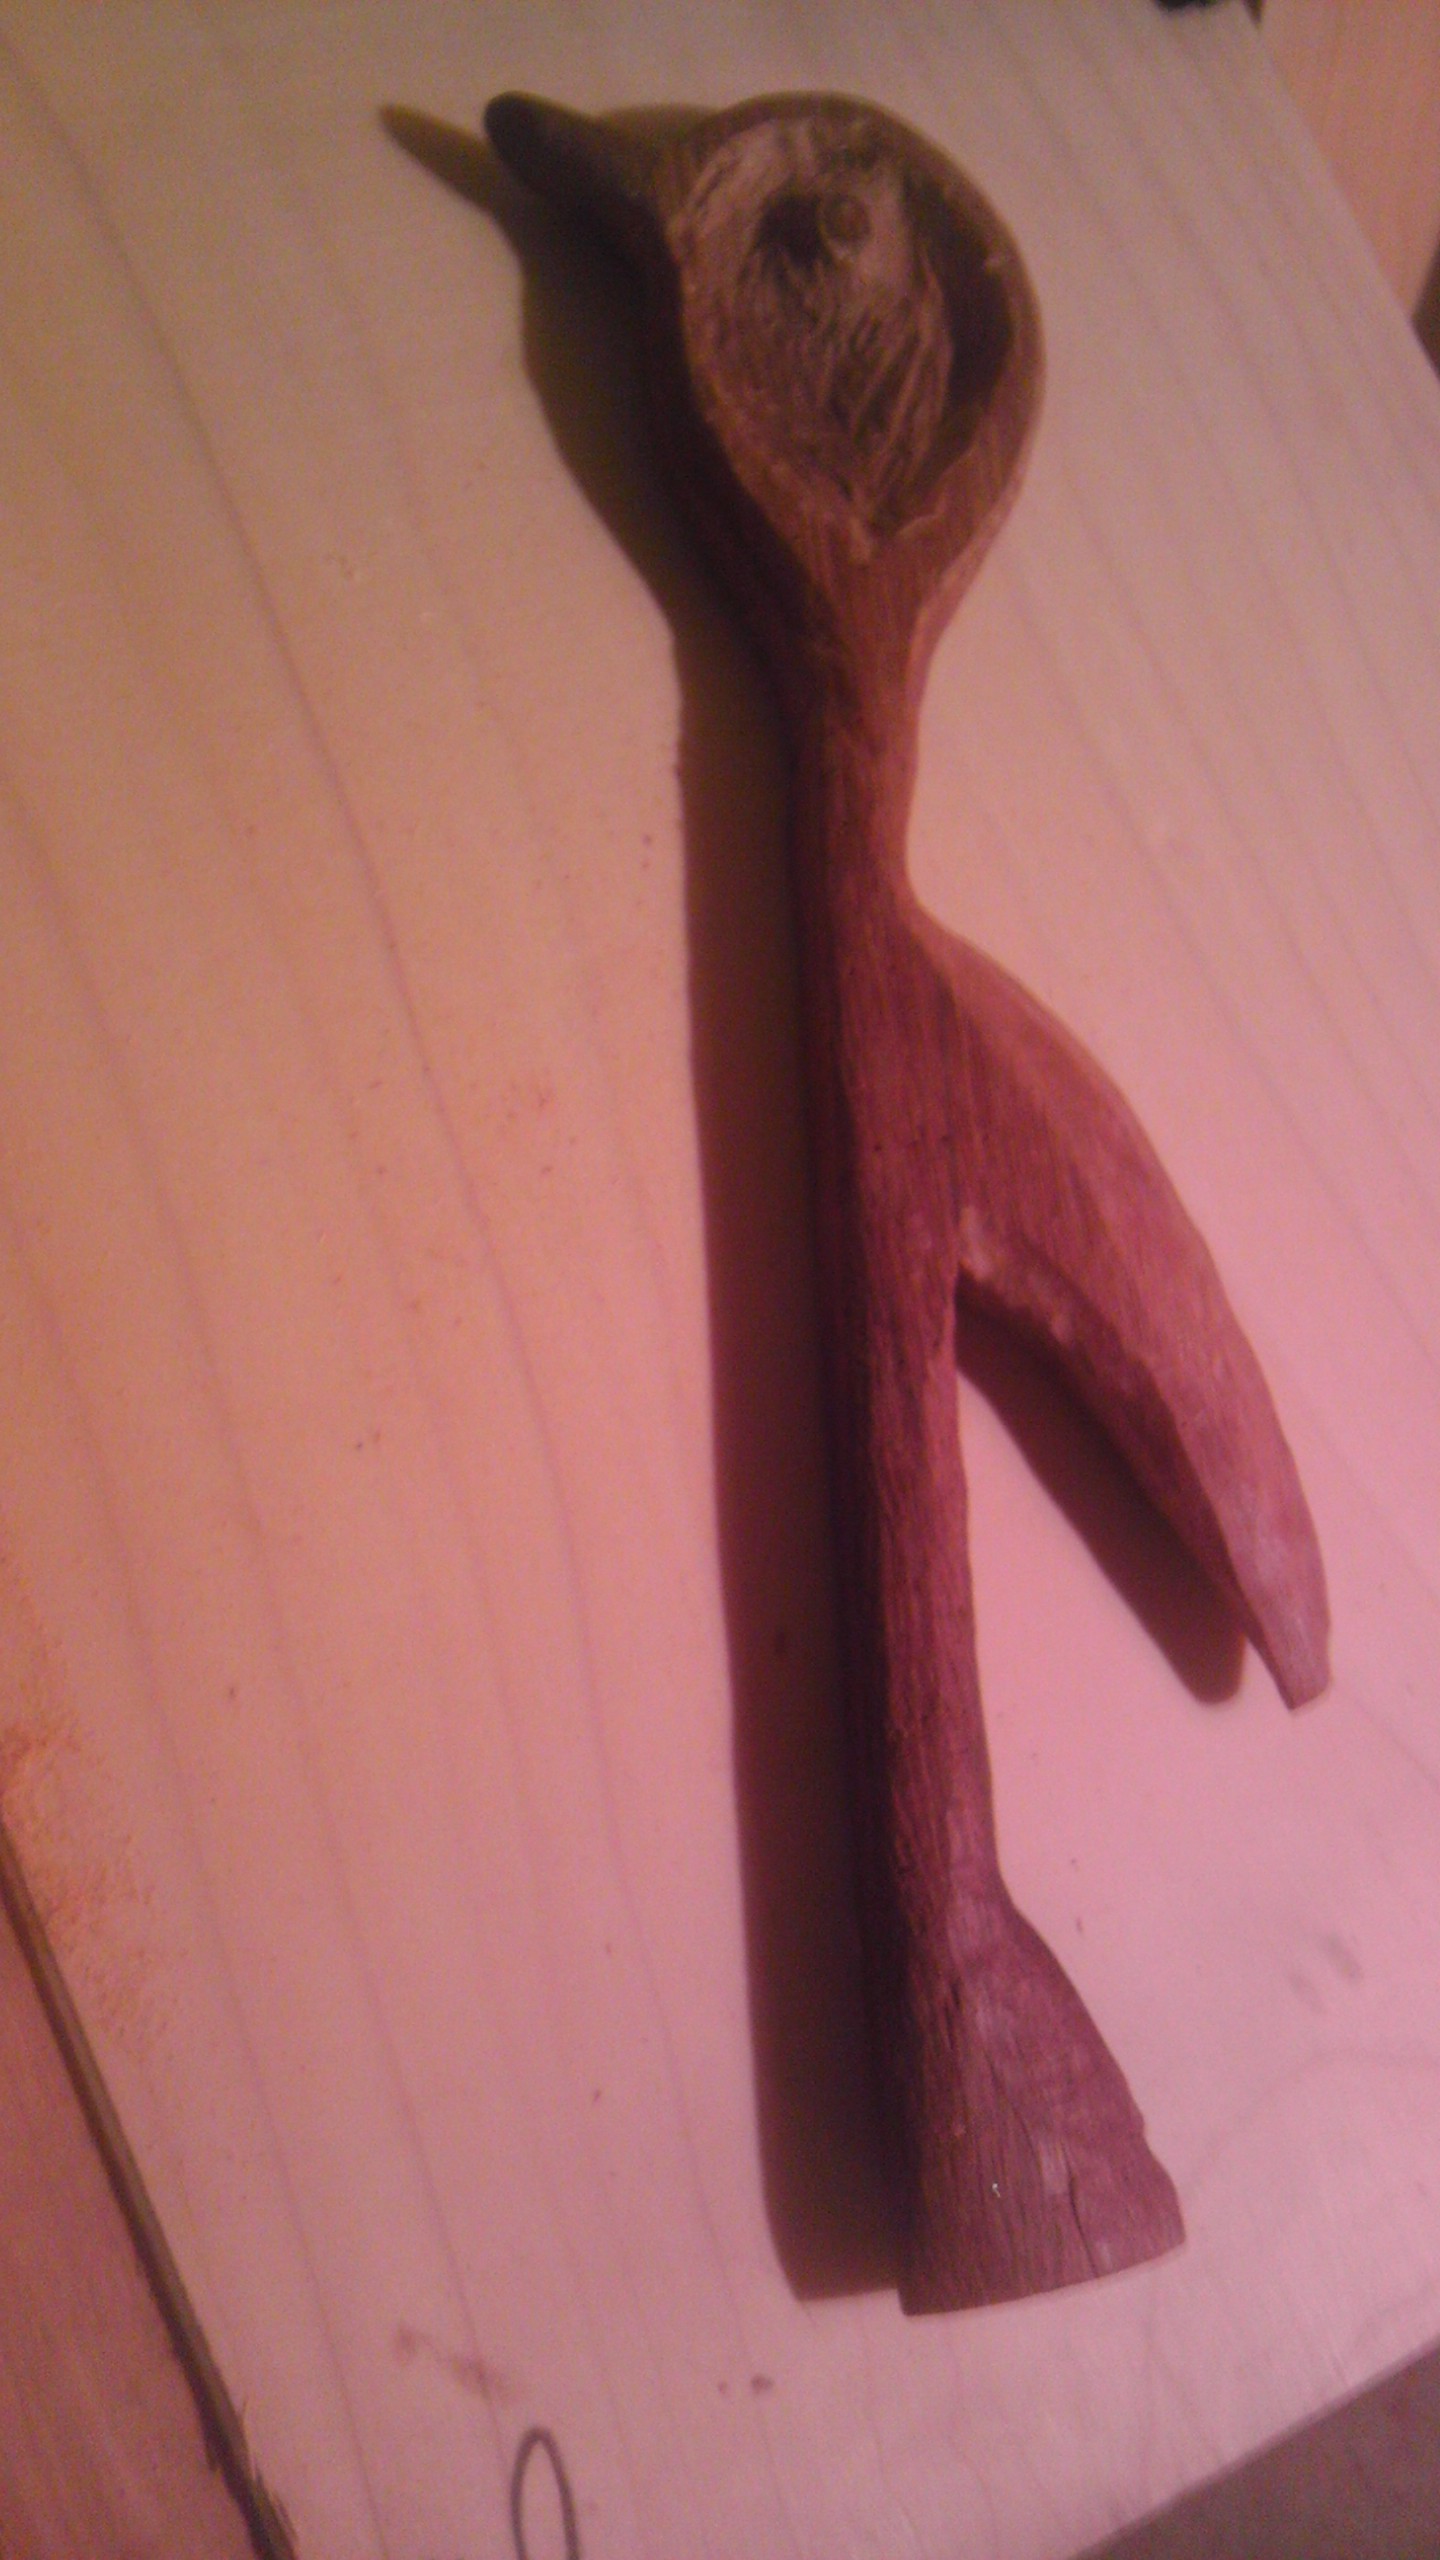
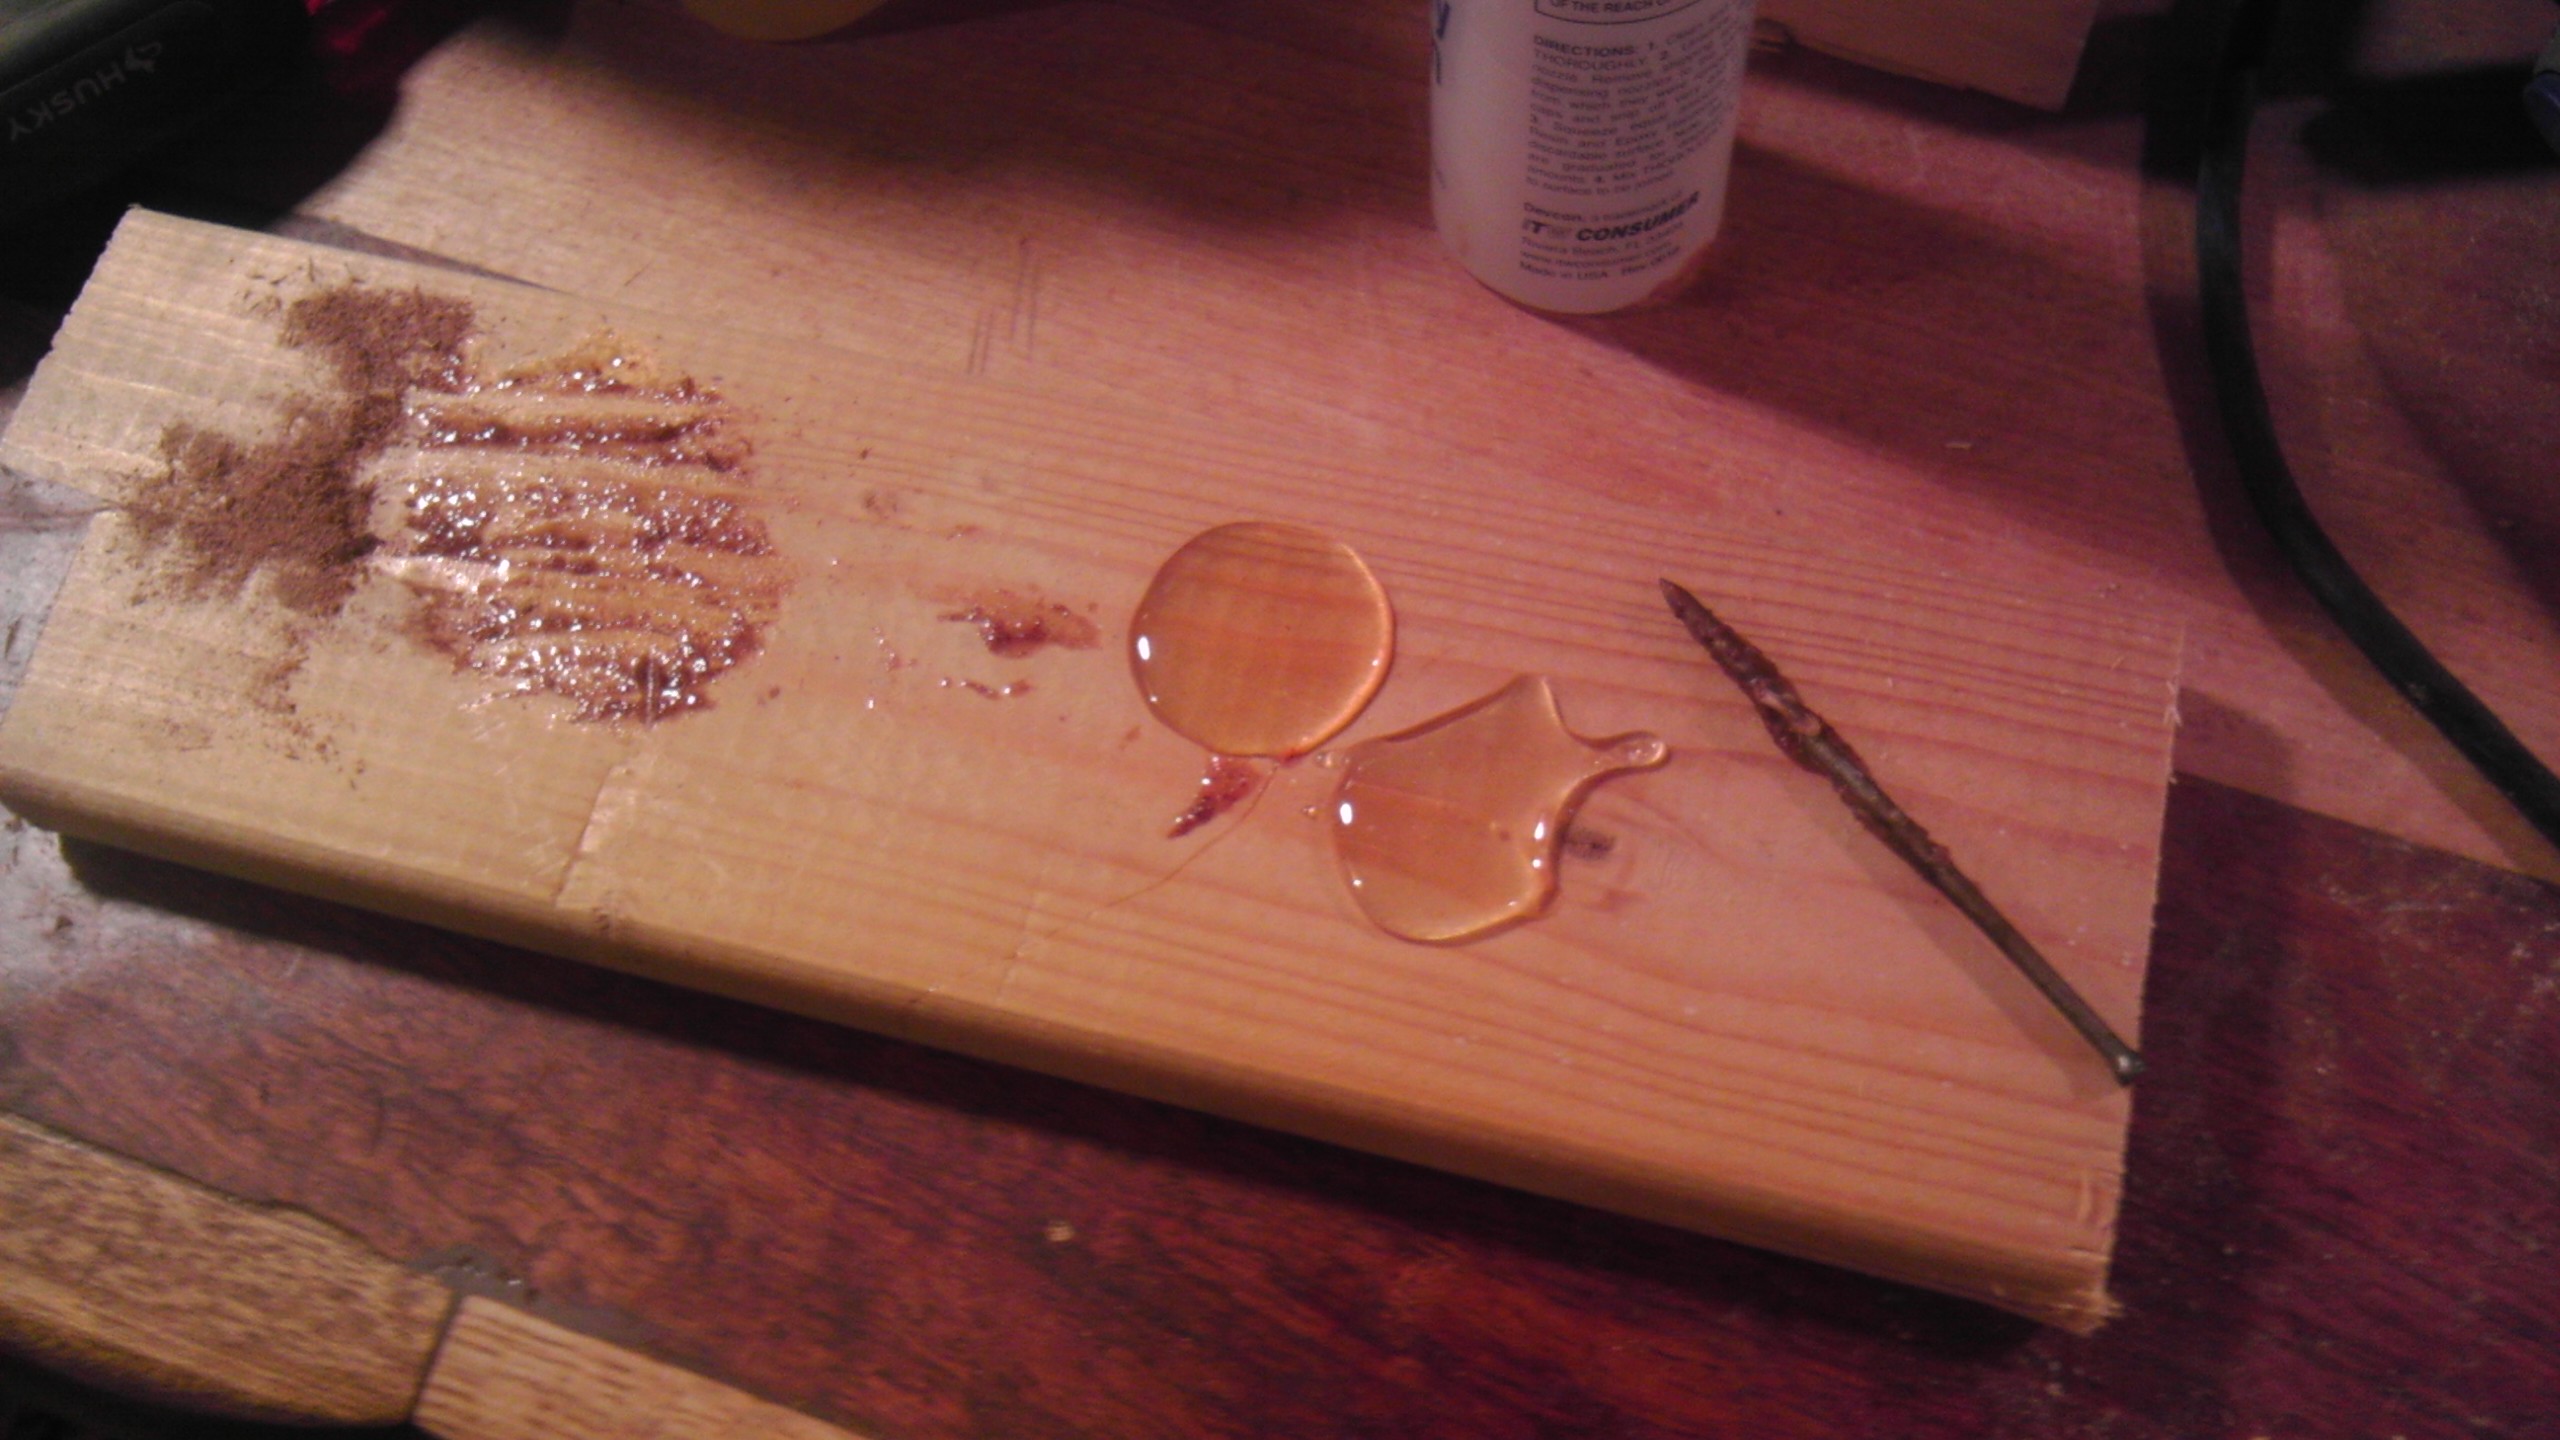
I had mentioned the grain of the hickory.  Click on it to expand.

Chair 1 - Kundalini

to me it certainly looked like a fire with smoke.  Euphemistically kundalini perhaps.  Made me think of a next chair where the stone capture technique from the jade box could surround one appropriate stone slice for each chakra.  <Sigh>.  More ideas than time, certainly, but I’d love to get to that one and you heard it here first.

I must also thank my Mother, for whom this was to be a birthday present back in 2013. She has been patient and kind in waiting.  May she have many years of comfort (if, of course, it is comfortable – I sure hope so – there are so many things one does not know when one builds a first thing in a genre).  I test sat in it.  It was not flimsy.  I felt as if I were at Campobello (translate as “some legendary place where folks who really matter contemplate the destiny of the world in the relaxed comfort of their private estates).  I mean, isn’t that the feeling that a proper Adirondack chair is supposed to generate?  Maybe also I felt this exaltation because of the kundalini channeling somehow made manifest in the chair – we’ll have to test it out on various subjects.

It was a fun project and I’m so glad to complete it.


Table 1

This is the first fruit of the new jointer being set up.  The joined boards were initially merely tests of having no daylight whatsoever in the joint, of having the joined boards form an honest plane, of the strength of the joint, etc.  The ‘no daylight’ requirement was fully met.  The ‘honest plane’ requirement, perhaps not fully.  I think the combination of making sure to consistently and equally pressure the board (passing of the jointer cutting head) to the fence and the blade) as well as insuring that the fence is “””perfectly””” (can’t put that in quotes enough) at 90 degrees are the refinements to be made, as well as to be more rigorous about what compromises can be accepted.

Table 1 A

The top is two pieces of zebrawood and the bottom is three pieces of birch, set perpendicularly to the top.  For each joined plane a piece of mahogany is notched into the cedar legs so that it goes across the seam of the joints it is supporting.

There are a lot of little imperfections in this one (as if that’s not always true), but I did not undertake it with any purpose except that I learn something.  The bonus benefit is that I had a Cable/DVD thing that resting on some milk crates inside the house.  Now I can have the use of those milk crates in the wood shop and house can have an upgrade.  Win-win, it seems (house and work room) with perhaps another thrown in (experience/knowledge).

Table 1 B

Some Beech

When some ways back I built those oak steps, I had obtained the material from a local tree guy who air dries what logs he can allocate and slice up himself on his portable sawmill.  In addition to the oak I had gotten two pieces of wide beech because they were cheap and I’d not worked with beech before.  These particular pieces, I’m not sure why, after I brought them home and lay them fallow for two years, demonstrated great warping and cupping – as if perhaps they were not as dry as he thought.  Next time I’ll being a moisture meter, but at the time I was not so sophisticated.

I decided that I’d be a frugal miller and see if I could get any utility out of them, beyond that of firewood.  The smaller piece was about six feet by 11 inches by one inch thick.  I cut it in half to reduce the impact of it not being straight but rather vaguely like a bow shape and put the halves seven times (sounds biblical, the halves seven times, or Talmudic, or alchemical, or) seven times the halves were put through the thickness planer, and though this cost them almost 5/16ths of their thickness most of the cupping/arching was removed. With a straight edge and tablesaw I took out the long curves and obtained the shelves you see below.

New Shelf April 2016

It was a harder wood than I thought, had to pre-drill the holes for screws (usually I don’t use nails of screws, but for rough carpentry I make exceptions).  The blond verticals are hackberry.  The gourds on the top shelf are very happy with the setup.

Tobacco 2

Greetings Dear Readers, earthbound or nay.  This transmission comes to you from the usual place on the usual frequency.  Those transmissions encoded in the shifting shapes of clouds and the specific patterns of raindrops landing I will not take responsibility for, though I will reluctantly acknowledge to contributing, albeit to the most minor of extents, to that grander milieu of phenomena.  Thus are the skids of mysterious incredulity greased.

Today’s post, a trifle long in being made, follows up on last August’s Tobacco 1 post, wherein our hero, Umgurk, having lost his reindeer, and it being dark and cold, sets forth… (wait, that’s not what it’s about).  That prior post detailed a little of the history of tobacco and that I was seeing how it grew.  Following that post came the tale of a strange ark, not a water bound ark, that would carry life forms (plants) across a condition they could not survive (winter) with ample room for roots.  OK, looked at another way it’s just a large wooden flower pot, but strange ark is much more poetic and suggestive to the imagination.

I had put the chosen tobacco plants which otherwise would have died and set them in the strange ark.  All winter long I watered them and throve they mightily.  By the end of March behold –

Tobacco plant

with flowers no less

Tobacco Flower

Not long after these pictures,, the largest of the plants fell under weight of its luxuriant leaves.  This told me it was time to harvest the first batch of those leaves.  The internet is full of accounts of how tobacco leaves are to be dried, subsequently fermented (cured), and thereafter used.  At the end of last summer when I had many tiny (3 or four inch) leaves I had tried to dry a few.  When stuck together they would molder.  Those not moldy were somewhat fragrant.  I tried an experiment – you heard it here first – I had some bluefish (I seek the collective permission of the universe to refer to the bluefish as mackerel here – there are meaningful similarities, a dark fishy-fish, though of course there are differences too) so anyway I had this mackerel (how easy was that?) and a whole bunch of fresh tobacco leaves – what about tobacco smoked mackerel?  How could an avenue as appealing as this have gone unexplored by earthly civilization?  Forty or fifty little leaves later (thrown into the grill underneath the fish), and it did produce a zaftig fragrance, I possessed the prize.  A similar result might have been produced by soaking the fish in water long standing in un-emptied ashtrays … but not really.  I just think that important adjustments might need to be made such as how many leaves, how much fire, tiger mackerel?, under which stars, etc.  The culinary road to heaven crosses many uncontemplated byways.

Trying to be fair to the many forms of goodness available in our universe I did consider the converse, of setting the leaves (misted) on the grill and the mackerel into the fire itself, so that the mackerel smoke could condition the tobacco.  I think that such tobacco would really open olfactory minds.  That idea is filed under “For another time”.

Back to the main theme, then.  I clipped off the biggest dozen leaves from the fallen plant and stood it back up.  I strung the leaves on a wire next to a heating vent in the workshop, hoping that the flow of air would deter mold.

Drying Tobacco 1 Drying Tobacco 2

and as yet (+ ten days) there is no mold.  The leaves continue to feel damp.  It is surprising how much moisture they contain and how strongly they clutch it.

Episode 3 of this series may feature efforts at curing and fermenting (assuming the drying does not fail), further escapades in tobacco-fish synergies, news of subsequent generations (the lead plant, having flowered, has produced many seed pods), or heaven knows.  Until that time may you thrive peacefully, or lean more in that direction, or not find the pain of being unable to thrive to be unspeakably odious, or – just do your best, ok?


Welcome 2016

Hello fair Readers, persons, life forms all

I have not much here today, other than a recognition of my posting slump and overdue wishes for health and strength and joy in 2016.  In fact, I’m so far behind in thinks to take care of (because I’m taking care of so many things) that the picture, indeed, you see that right, in fine January light, is from January 2015 and I believe that it’s now February 2016.  C’est la vie?

20150101 Desmond at Plum Island

Since early December I’ve been on a project that has required a great amount of new learning from me.  This is the main reason I’ve been so non-productive elsewise.  I earnestly hope to brightly fulfill these currents demands sooner than later and return to my happy practice of sharing experience with you.


Wintergreen

This will not be such a learned post, in that I could/should provide a host of links to educative references, so forgive me those who have come to rely on those.  Here’s one link though, Wintergreen, that should give gross background, more than that this is a flavor of chewing gum.

Wintergreen Leaves

The basics here are that it grows in the many oak/pine/maple woods locally and for decades I’ve occasionally picked and bruised a leaf just to smell the very lovely smell, thought of in gum as a kind of mint but really not being a mint at all.  Nowadays they get the same flavor from birch twigs so these little leaves get left alone.  The plant grows very close the ground, never gets big, but the leaves stay green in the winter.  I wonder how it got its name?

I did enough online research to learn that the native Americans made a medicinal tea from it and that just boiling the leaves does a very poor job of extracting either their flavor or their virtue.  OK, I did do enough research to learn that the Wampanoag word for it is gôgôwibagok.  Say it five times fast.  Seems that to extract the flavor and goodness it must be allowed to ferment for some days in a warm place, till it starts to bubble.  I washed the leaves, put them in a water bottle, and set them on the windowsill.

Wintergreen Leaves Immersed

Days pass.  And more, as if days pass of their own volition.  I notice the bubbles.  Smells good.  Ten days I let it ferment, or at least sit in tepid water.  The water vaguely tinted brown.  The bubbles never got too rowdy.  Eventually I figured I had to boil, test, and bottle.

Wintergreen Tea

So far the test has gone well.  I drank five ounces 45 minutes ago and here I am typing. The active ingredient is methyl salicylate, a cousin of salicylic acid, which in turn is the active component in aspirin.  The easing of aches and pains and the reduction of fever really were the only highlights I could expect, and I did not have aches nor a fever, so I’ll take the absence of detriment as the ok for this concoction.  Be warned though, methyl salicylate is toxic in sufficient quantities and you should probably only go this route if your insatiable natural curiosity so commands.  To temper the warning though, folk wisdom is wise for a reason.  In their day, these leaves helped the sick.  You’d have to go way way beyond soaking a handful of leaves in water for a few days, like off the spectrum beyond, to turn a natural medicine into an unnatural disaster.

Anyway these are my happy bits for the day.  May you explore the natural world with continuing ontological wonder.